If you have ever looked at a planted aquarium and wondered how those plants stay so lush and dense, the answer is usually CO2 management. Plants need an ideal CO2 concentration for photosynthesis. In a closed glass box of water, that CO2 does not just appear at the right levels on its own. This is where a CO2 regulator comes in.
Content Table
What is a CO2 regulator
What is a CO2 Regulator
A CO2 regulator is a device that attaches to a pressurized CO2 cylinder and controls the flow of gas into your aquarium. Think of it like a very precise faucet. Without one, you would be releasing raw high-pressure CO2 directly into the tank, which is dangerous for fish and basically impossible to manage. The regulator steps down to something workable, then lets you dial in exactly how much gas enters the water.
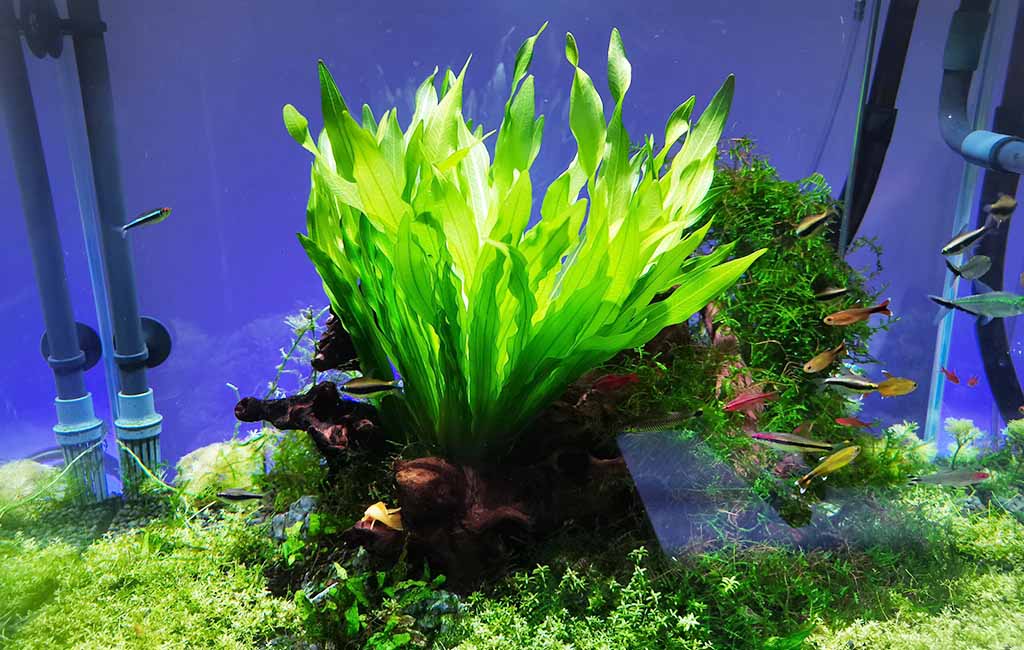
In a planted aquarium, CO2 is one of the biggest factors determining how well plants grow. Light and nutrients matter too, but without adequate CO2, most of plants just sit there. They survive but do not actually grow well. A reliable regulator and an ideal CO2 concentration for plants give you real control over that.
What PSI Should the CO2 Regulator Be Set At
This is one of the first things people ask when setting up a CO2 system, and the answer depends on a few factors.
The working output pressure on most CO2 regulators sits somewhere between 20 and 40 PSI. That is the pressure being sent from the regulator through your tubing and into the diffuser. The cylinder pressure will read much higher, often around 800 to 900 PSI for a full tank. That is completely normal and not something to worry about.
What actually matters is the output pressure, which gets adjusted based on the length and resistance of your tubing, the type of CO2 diffuser you use, and the depth of the tank. Deeper tanks need slightly more pressure to push bubbles down effectively. Longer tubing runs add resistance too.
For most standard CO2 regulator setups, 20 to 30 PSI output pressure is a reasonable starting point. After that, fine-tuning happens through the motorized needle valve, which controls the actual bubble count going into the tank. Most of the precision work lives in that needle valve adjustment.
ideal CO2 concentration for plant
Ideal CO2 Concentration for Aquatic Plant Tanks
The general target for a planted aquarium is around 20 to 30 mg per liter of dissolved CO2. That range keeps plants in good shape without stressing fish.
Below 15 mg/L, and plant growth slows noticeably. The plants look okay, but not healthy. Above 35 mg/L, and fish start running into trouble. High CO2 concentration affects their ability to absorb oxygen, and you will see them gasping near the surface. That is a clear sign to pull things back.
A drop checker with pH indicator fluid is the most popular monitoring method among hobbyists. Green fluid means CO2 is in the right zone. Yellow means too much. Blue means not enough. Simple, visual, and reliable for day-to-day observation.
How to Judge and Adjust CO2 Levels with a Regulator
Beyond the drop checker, there are a few other ways to read what is happening in the tank.
Pay attention to fish behavior, especially early in the morning before the CO2 injection cycle starts. Lethargy or surface-hanging can signal that CO2 was too high overnight or that gas exchange at the surface is poor. Adding surface movement through a cooling fan or adjusting the filter outflow can help with both.
Watch for pearls. When tiny bubbles form directly on plant leaves during light hours, that is photosynthesis happening at a healthy rate. Consistent pearling usually means CO2 and light levels are working well together.
To adjust: use the needle valve. Small turns make real differences. If CO2 is too low, open the valve slightly and then wait a full day before reading results again. The water takes time to stabilize. Rushing adjustments is the most common mistake people make when dialing in a new system.
Ideal CO2 Concentration
Can an Oxygen Regulator Be Used for CO2
Short answer: no, and it is worth understanding why rather than just taking it on faith.
CO2 regulators and oxygen regulators are built to different specifications. The internal components, seals, and gauge calibrations all differ. CO2 reacts with moisture to form carbonic acid, which corrodes materials not designed to handle it. An oxygen regulator may physically fit a CO2 cylinder depending on the threading, but that does not make it safe or accurate.
Using the wrong regulator risks inaccurate pressure readings, potential leaks, and equipment that degrades faster than it should. Always use a regulator specifically designed and rated for CO2. That is a non-negotiable part of building a safe system.
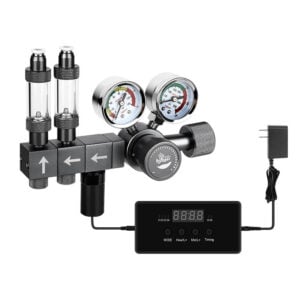
HC039 CO2 Regulator with Motor Valve: A Solid Option Worth Knowing
Let us talk about the hygger HC039 CO2 Regulator with Motor Valve, because it addresses several common frustrations in the planted tank hobby.
What Makes It Stand Out
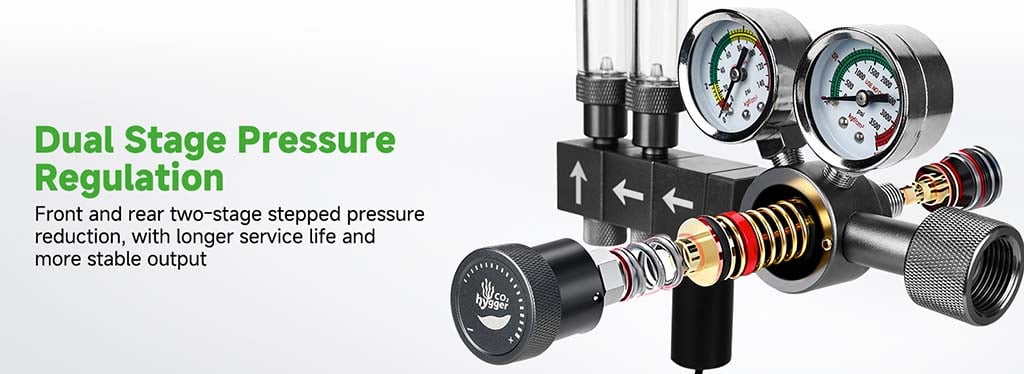
The HC039 uses a dual-stage pressure regulation structure. Pressure is stepped down in two stages instead of one, which produces a more stable output. Single-stage regulators are more prone to “end of tank dump,” where pressure spikes unpredictably as the cylinder runs low. Dual-stage designs handle that much better.
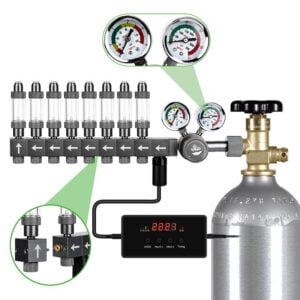
It also ships with an expandable manifold that supports two bubble counters out of the box, meaning simultaneous CO2 supply to two tanks. The design allows adding up to eight bubble counters over time. For anyone building a fish room or planning to expand, that kind of scalability is genuinely useful rather than something you have to buy an entirely new unit to access.
The motorized valve is probably the standout daily-use feature. Paired with a timer, it automates CO2 injection entirely. The valve opens when the lights come on and shuts off at night. The motor only activates during opening and closing cycles, so it does not run constantly or generate heat, and power consumption stays low.
Build quality feels solid. The housing is aluminum alloy, which resists rust and holds up well over time. The dual gauge setup makes it easy to monitor both cylinder pressure and output pressure at a glance. A built-in check valve in the bubble counter prevents water from backflowing into the regulator, which is a small detail that saves a lot of frustration.
HC039 CO2 Regulator Review
A Few Things to Keep in Mind
The motor valve is not waterproof. Keep it away from splashing water, especially if the setup sits near tank level.
The valve makes a small sound when it opens or closes. That is normal operation. First-time users sometimes assume something is wrong, but it is just the mechanism working as designed.
If the diffuser stops producing bubbles while the bubble counter still shows activity, check all the hose connections. Micro-leaks in tubing joints quietly rob pressure and can be easy to miss.
Overall Verdict
The HC039 is a well-built, feature-rich regulator that suits hobbyists who want automation and room to grow a system over time. The dual-stage pressure design, motorized valve, and expandable manifold put it meaningfully ahead of basic single-stage options. For anyone managing multiple tanks or wanting a more hands-off approach to CO2 control, it holds up well.
How to Set Up a Pressurized and Extendable CO2 Regulator System
Setting up the HC039, or most pressurized CO2 regulators, follows a similar process regardless of brand.
- Attach a Regulator
Start by attaching the regulator to the CO2 cylinder. Make sure the washer or gasket is seated properly before tightening. Hand-tighten first, then use a wrench for a secure connection without overtightening the fitting.
- Connect the Tubing
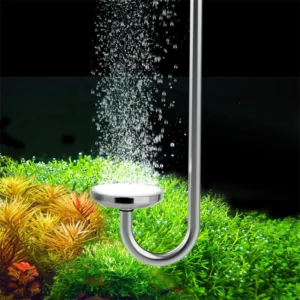
Connect the tubing to the output port on the bubble counter. Run that tubing to the CO2 diffuser inside the tank. Position the diffuser near the filter intake so bubbles get pulled through the water column and dissolve more efficiently.
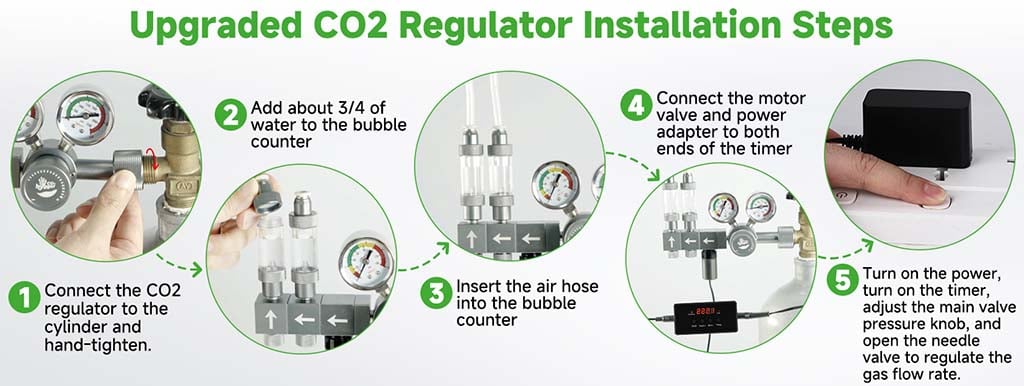
CO2 regulator setup
- Open Cylinder Valve Slowly
Open the main cylinder valve slowly. Watch the cylinder pressure gauge climb to its resting pressure. Then adjust the main regulator knob to set output pressure, starting around 20 PSI. From there, use the needle valve to control bubble rate. One bubble per second is a reasonable starting point. Observe the tank for a day before making further adjustments.
- Connecting Timer
If using the HC039 motorized valve, connect it to the timer according to the manual and set CO2 to run only during the light period. Running CO2 at night when plants are not photosynthesizing builds up levels that stress fish by morning.
- Cross Check Connections
Before leaving the system running, check all connections for leaks using soapy water around the joints. Bubbles forming at a joint mean air is escaping, and the connection needs attention.
Wrapping Up
Getting CO2 injection dialed in takes some patience, but once the system is stable, the difference in plant health is obvious. A quality regulator is the foundation of that whole system. Whether this is a first CO2 setup or an upgrade from something basic, understanding how each part works makes the process far less overwhelming. Start conservatively, watch closely, and adjust slowly. The tank will tell you what it needs.
Related Products

Leave a comment