To have a planted aquarium thrive, you must do more than only feed the fish and set up the lighting. Carbon dioxide (CO₂) is very important for rich plant growth and a reliable aquatic ecosystem. CO₂ is important for aquatic plants to photosynthesize, but in an aquarium, it can easily become scarce. This is where a CO2 diffuser in an aquarium becomes useful. The inline CO2 diffuser is the ideal accessory for people who care about CO₂ levels in their aquariums.
Content Table
In this guide, we’ll define a CO₂ diffuser, explain how it works, and explore the steps to set it up. Also, determine when your tank needs CO₂ and how to introduce it. It’s time to get started.

CO2 diffuser in aquarium
What is a CO₂ Diffuser in an Aquarium?
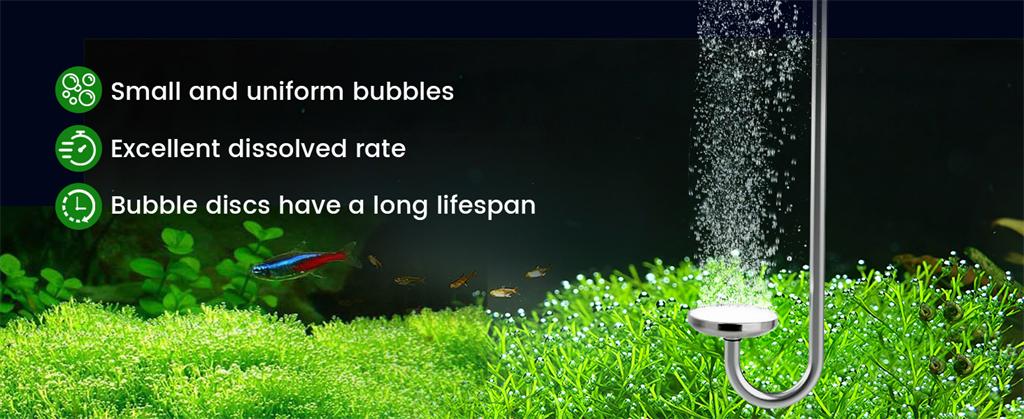
An inline CO₂ diffuser is a gadget in fish tanks that helps to spread carbon dioxide into the water in the form of little bubbles. Because the bubbles dissolve in the water, CO₂ is now accessible for aquatic plants to use in photosynthesis.
Both CO₂ entering through the air and organic matter decay contribute to CO₂ in natural water. Still, the lighting in an aquarium is usually not very bright or is turned off at times. In low CO₂ setups, aquatic plants usually fail to thrive and can perish in high-light situations since their demands are high.
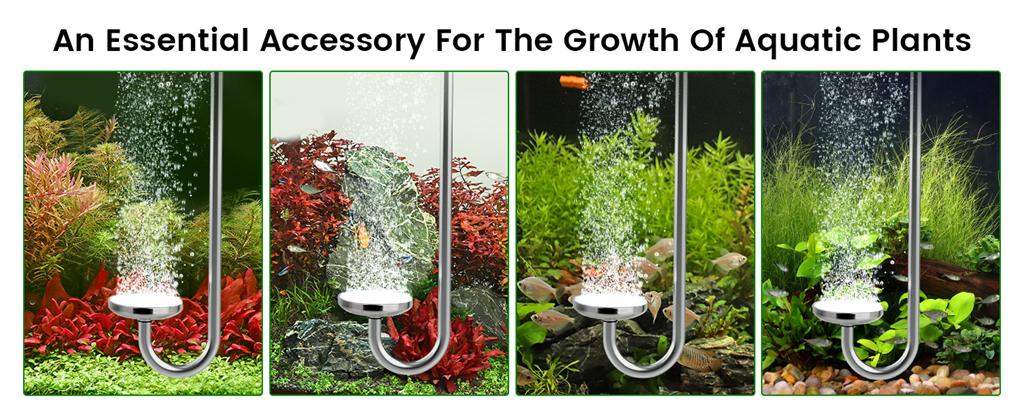
A CO₂ diffuser in aquarium makes it easier for the CO₂ to enter the water. So, plants have enough carbon to grow. Also contributing to adding lush leaves and keeping the ecosystem in balance. With the hygger CO₂ Diffuser Atomizer, the process is made easier and more refined.
How does a CO₂ Diffuser Work in an Aquarium?
CO₂ diffusers rely on gas exchange and the best use of surface area to do their job. The CO₂ system is connected to the diffuser through tubes made of silicone. As the gas goes through the diffuser, it passes over a tiny plate made of ceramic which divides it into many bubbles.
The higher surface area-to-volume ratio of these microbubbles means that the CO₂ quickly goes into the water nearby. The hygger HC008 diffuser works especially well, making sure the plastic bag’s bubbles are small and evenly distributed in the water.
The diffuser’s body is made from stainless steel, making it tough and giving it a slender design that matches your designed fish tank. The design of the air inlet and suspension makes the CO₂ diffuser both easy to operate and visually attractive.
How to Install and Place the CO₂ Diffuser in a Fish Tank
To use your CO₂ diffuser well and ensure there are no problems in your tank, you must install it correctly.
Installation Steps:
- Choose the Location: Place the diffuser near the bottom of the aquarium. This allows the CO₂ bubbles to rise slowly, increasing the time they have to dissolve in the water.
- Attach the Tubing: The diffuser is designed to fit 4/6mm CO₂ tubing(3/16″ inner diameter). Use the conical structure of the inlet to secure the tubing tightly, preventing slippage.
- Secure with Suction Cups: Use the provided suction cups to anchor the diffuser to the tank wall. Make sure it is stable and not obstructed by decor or plants.
- Install the Diffuser Cup: Ensure the O-ring seal is correctly in place before screwing on the diffuser cup. Tighten it securely to prevent CO₂ leakage.
Usage Tips
- Initial Bubble Behavior: Don’t be concerned when you see an excess of large bubbles during the first use. The condition is common and should settle down in 1–2 days.
- Cleaning: Ceramic discs can get clogged with dirt and debris over their use. If bubbles don’t appear, take out the disc and soak it in bleach solution for approximately 20 minutes before washing.
How to Know If the CO₂ Is Too High in Your Aquarium
Adding too much CO₂ can be harmful to fish and shrimp. It’s important to monitor and maintain optimal levels.
Signs of CO₂ Overdose:
- Fish gasping at the surface
- Erratic swimming or lethargy
- Sudden deaths of livestock
- pH drops significantly in a short time
inline CO2 diffuser
How to Monitor:
- Drop Checker: It’s a well-used tool that transforms color depending on how much CO₂ is around. Green means that everything is balanced, yellow shows high CO₂, and blue shows low CO₂.
- pH-KH Chart: You can estimate how much CO₂ is in your tank by comparing its pH and the carbonate hardness (KH).
- Bubble Counter: Watch the screen to see the CO₂ bubbles created every passing second. Oxygen normally trickles in at a rate of 1–3 bubbles/second when the fish tank is small, and at 3–5 per second for a larger one.
Always aim for a stable, gradual CO₂ increase rather than sharp spikes, which can be dangerous to your aquarium inhabitants.
When to Add CO₂ to the Tank
Injecting the CO₂ at the correct rate helps your plants grow faster and puts less pressure on your fish. Since plants rely on light to take up CO₂ through photosynthesis, it’s very important to coordinate the two schedules.
Recommended CO₂ Schedule:
- CO₂ injection should begin approximately 1–2 hours before you switch on the lights. So, CO₂ levels in the water rise, making it readily usable by plants during photosynthesis.
- Make sure to turn off the CO₂ one hour ahead of your usual lights off time. If there isn’t any light for plants, they will not photosynthesize, making it pointless and even harmful to add CO₂ overnight.
Pro Tip:
To make your CO₂ delivery automatic, attach a solenoid valve to a digital one. If your lights go on at 10:00 AM and turn off at 8:00 PM. Make sure your CO₂ levels begin at 8:00 AM and shut down at 7:00 PM. The automation is driven by precision to help prevent any problems and mistakes.
Ideal CO₂ Levels
- Set the level of dissolved CO₂ to 20–30 parts per million (PPM) during the time you have lights turned on. This level of water hardness suits most plants underwater and does not affect your tank animals.
- To get a visible sign, add a CO₂ drop checker to a tank with a 4 dKH solution. If the line on your screen is green, your CO₂ is just right; if blue, the reading is too low, and if yellow, it is too high.
- If your pH falls by about 1 unit from its original value, it means CO₂ saturation is healthy.
Remember: Don’t change the amount of CO₂ in the water quickly; raise the bubble counts over several days. The most important thing for a healthy planted aquarium is gradual adjustments and consistency.
As We Have Seen
hygger’s CO₂ Diffuser Atomizer makes CO₂ injection reliable, looks good, and is easy to use in tanks. Its stainless steel body and the ceramic discs help ensure good gas circulation and sustain plant growth.
Here’s a quick recap of what makes this diffuser stand out:
- High-Quality Material: Rust-resistant 304 stainless steel ensures longevity and structural integrity.
- Superior Ceramic Plate: Produces fine, uniform bubbles for maximum CO₂ absorption.
- Easy Maintenance: Detachable diffuser disc for straightforward cleaning or replacement.
- Elegant Design: Curved hanger design suits various tank sizes and setups.
- User-Friendly Features: Sealed threads, conical air inlet, and simple installation process.
Using this diffuser will ensure your aquarium plants do well and your tank experiences a healthier and a natural balance. Having the hygger CO₂ Diffuser in an aquarium is a smart idea, whether you’re just starting with aquascaping or have been doing it for years.
Related Products


Leave a comment