Revised for Improved Understanding of Instructions by John Howard
The following fish feeder programming is a supplementary guideline by the enthusiastic hygger customer John Howard. Thank you very much for Mr. Howard’s support and love for the hygger Aquarium. Hope this hygger auto-feeder guideline helps you enjoy the feeder more.
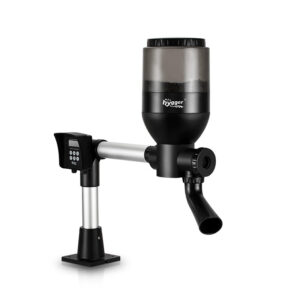
When you go out for a holiday or business trip, the hygger 967 auto fish feeder will help you take care of your fish. The feeder can automatically dispense food at a scheduled time. Feeding time and quantity can be set in advance.
Content Table
Product Feature
- Easy-to-read LCD with clock
- Up to 6 feeding times per day (See 3. table below)
- 9 programmable feeding times per 24 hours; each quantity runs 8 seconds (8 seconds is factory set and cannot be reprogrammed by the user)
- The “HAND FEED” button allows for instant feeding; runs for 8 seconds when the “HAND FEED” button pressed
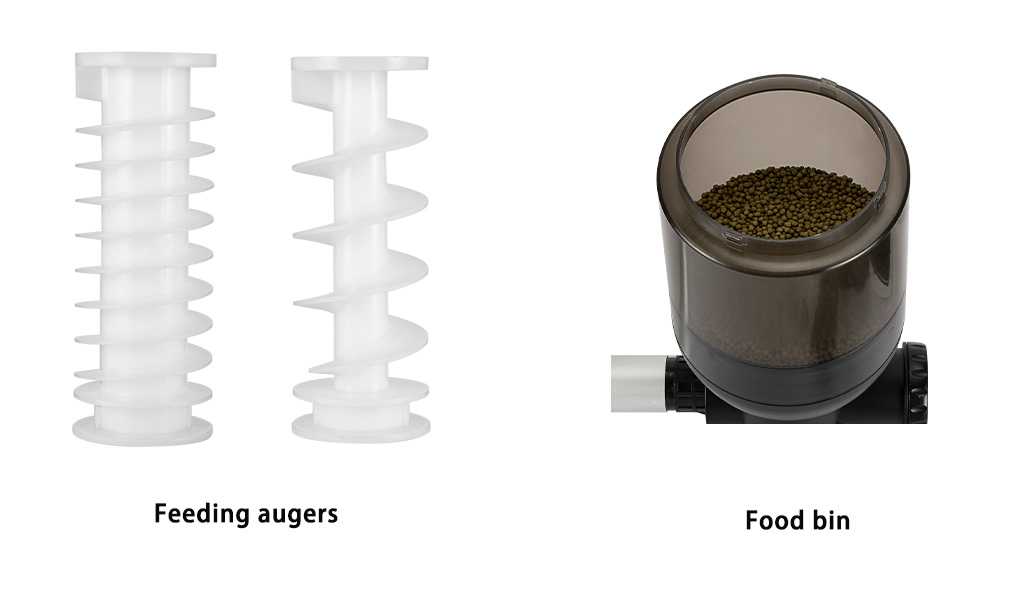
- The fish container can be loaded up to 5.5 L, 2.3K, or 81 ozs. of fish food
- Included are two different-sized feeding augers that can be used according to the feeding demand (Fine thread auger = smaller quantities; large thread auger = larger quantities)
- Programmable feeding times can be set on an hourly basis (time is based on a 24-hour clock, no minutes can be programmed), and the number of 8-second feeding quantities
- Waterproof design for outdoor use
- Easy to install and can be installed on wood, stone, or ceramic tile surfaces.
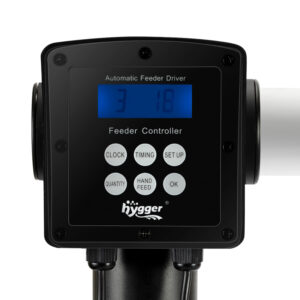
Control Panel
Current graphic and instructions labels are self-explanatory for the display.
Factory-programmed feeding times
| Number of Meals | Feeding Time | Quantity |
| 1 | 07:00 | 3 |
| 2 | 12:00 | 3 |
| 3 | 17:00 or 5 PM | 3 |
| 4 | – – | – – |
| 5 | – – | – – |
| 6 | – – | – – |
“- -” means feeding time is not factory programmed and can be user programmed.
Remember, each feeding time is 8 seconds. Thus, a “Quantity” setting of 3 above, equals a 24-second feeder run time.
Meals 1 through 3 are factory-programmed example settings only. All 6 meals, feeding times, and quantities should be user-programmed to ensure overfeeding does not occur.
4. Memory Functions
- The memory function enables to restoration of the previous setting
- LED indicator light: the indicator light turns on blue when the device is in manual or automatic feeding mode. The indicator light keeps flashing when it stops.
- NOTE: This is the only reference I could find referencing “Memory Functions”, thus do not know how it works or whether it is useful or not. MFG needs to better explain or delete “4. Memory Functions”.
Installation and accessories
- These instructions appear self-explanatory and easy to assemble the unit.
Control Process
- Auto-feeding once desired feeding times have been reached.
- The LCD indicates the next feeding time, the feeding meal, and the selected feeding time.
- The graphics here are self-explanatory.
Program Feeding Time & Quantity
1 Clock Time Setting (Note graphics are self-explanatory)
Local Time
- Press the “CLOCK” button to review the current time settings. To set “the 24-hour clock to local time” setting:
- Press the “CLOCK” button and then press “The SETUP” button to enter time setting mode. Press the “CLOCK” button repeatedly to set the desired hour. Then press the “TIMING” button repeatedly to program minutes for local time.
- After finishing setting the desired local time, press “OK” to save settings and return to the main mode.
2 Feeding Time Settings
(Note graphics are self-explanatory) This graphic displays the next meal as the #3 meal and is programmed to begin at 17, or 17:00 (5 PM).
Feeding Time
Press the “TIMING BUTTON” to view the feeding times. Now, repeatedly pressing the “SETUP” button takes you through all six feeding times currently programmed.
Directions to Set Feeding Times:
- Press the “TIMING” button and then press the “SETUP” button to enter the setting feeding time mode.
- Press the “TIMING” button repeatedly to program the hour when the first meal-time will occur. Note, that “- -” indicates no feeding.
- Caution: A “00” setting equates to a “MIDNIGHT FEEDING CYCLE”, not a no-feeding cycle.
- Upon completion of the first meal-time setting, press the “SETUP” button to advance to the next feeding time setting. Repeat the procedure for each of the six meal-time feeding settings as desired.
- After finishing all desired settings, press “OK” to save all feeding time settings and return to the main mode. Again, feeding times can only be programmed to the hour, not to the minute.
3 Feeding Quantity Settings
(Note graphics are self-explanatory) This graphic is displaying the 3rd meal, with a quantity of 3. This equates to an 8-second feeding run time, times 3, or a 24-second feeding run time. (8 x 3 = 24).
Feeding Quantity
Press the “QUANTITY” button to view the programmed feeding quantities.
Quantity setting for each meal:
- Press the “QUANTITY” button and then press “SETUP” to enter the quantity setting for each meal.
- Press the “QUANTITY” button repeatedly to adjust the feeding quantity up to a maximum of 9 settings.
(“- -” means a zero-feeding quantity setting). Press the “SETUP” button again to advance to the next feeding quantity setting. - After finishing all desired quantity settings, press “OK” to save all settings and return to the main mode.
Note: Again, each quantity is automatically set to run the feeder for 8 seconds. For example, a quantity setting of 2 will equate to 16 seconds of feeder run time, and a quantity setting of 3 will equate to 24 seconds of feeder run time, up to a setting of 9, which equates to a 72-second feeder run time.
4 Manual Feeding, or Instant Feeding
Press the “HAND FEED” button for any time feeding.
5 Automatic Feeding Pause Function
Press the “OK” button to pause automatic feeding when it is running on automatic feeding. You can see the indicator light flashing. Press the “OK” button again to continue automatic feeding. When only one meal is programmed each day, the display will show “- – ” for one hour after the day’s feeding cycle. This indicates that the feeding cycle(s) for today has been completed.
The remainder of the instructions are self-explanatory.
Related Products

Can order a feeder bin top cap
Can I get new cap mine is cracked an when it rains I got replace the food
Hi John stallcop,
hygger customer service will reach out to you and help to solve the issue you are having.
Thank you for your patience and support.
Thanks
hygger team
Great manual except my issue is more related to actually building the thing! I’m wondering if there’s something wrong with mine. I’m assuming from the instructions that the 2 silver self tapping screws are to fix the upright pole to the angled connector (which I’ve done) and the other from underneath the cross tube to the feeder but it doesn’t bite. There is just a small hole in the black piece which I assume is housing the motor but it won’t take the screw.
Hi Paul Owen,
Thanks for your message, and sorry for the inconvenience caused to you.
We need more details about the issue, would you please shoot a video and mail it to [email protected]?
hygger customer service will reach out to you and help solve the issue you are having.
Thanks
hygger team
Can I order a new controller for my fish feeder. If so from whom.
Hi Kyle Wingo,
hygger customer service will reach out to you and help you solve the issue.
We will be waiting for a reply from your mail.
Thanks
hygger team
Hello, I just received your product and set it up per the manual. However, the clock does not advance once I set the time of day. I was able to easily set it per your instructions but it remains frozen at the time at which it was set. Manual feed works fine but the clock won’t advance to activate the automated feeder. Please advise…
Hi Scott Frank,
For the issue, hygger customer service will reach out to you and help you solve it.
We will be waiting for a reply from your mail.
Thanks
hygger team
Hi exactly what power adapter do I need to buy for this unit to power up .l live in us
Hi, Fred. The power adapter specification can be:
Input: 100-240V, 50/60HZ, 0.7A
Output: 12V, 1000mA
Rated Watts: 12W
That’s it. You can buy one at Amazon. Hope it can help you out.
Thanks,
hygger team
What does the first number in the quantity reading signify and how can I ensure 2 daily feedings at 24 seconds (8)?. I’m having a hard time just setting two feedings a day for a cycle of 24 seconds because there is no verification indicator. The screen keeps defaulting to the numbers 2 and 13. I will be in another state and I am not understanding how to get confirmation of the pre-program times.
Hello, Connie. In the quantity reading, the left number means the number of meals, and the right number refers to the quantity of the meal.
To set feed 2 times each day (24 seconds for each time), you can follow the steps below (after finishing the settings of meals and scheduled feed time.
1. Enter the portion (quantity) setting interface: Press the “QUANTITY” button, then press the “SET UP” button.
2. Set the quantity of first meal: press the “QUANTITY” button to choose “3”.
3. Set the quantity of second meal: press the “SET UP” button to choose “2” and press the “QUANTITY” button to choose “3”.
4. Set the quantity of the remaining meals: press the “SET UP” button to choose the number of meal and press the “QUANTITY” button to choose “–“.
5.Press the “OK” button to confirm.
By the way, you can read Easy Tricks to Program Fish Feeder for Auto Feeding to learn more settings about the auto fish feeder.
Any questions, feel free to contact us.
That’s it.
Thanks,
hygger team
Send me an instruction manual paid a fortune for your product and it came with no directions
Hi Adrian Fehr, you can get the hygger 967 instruction manual here
Any questions or suggestions about hygger, please get touch to us.
Thanks
hygger team