An aquarium light can make your tanks more attractive, while it also meets the photosynthesis requirements for aquarium plants. Today’s article will make a comparison of two aquarium lights. After reading this article, you can learn more about hygger 957 and 978 aquarium lights.
Content Table
A brief comparison between hygger 957 and 978 aquarium lights
This part will provide an overview of 957 and 978 lights. And here is something you should know in advance: the “√” in the table below refers to the aquarium light with the feature, while the “×” means that the light does not possess the feature.
| Features | hygger 957 aquarium light(HG957) | hygger 978 aquarium light(HG978) |
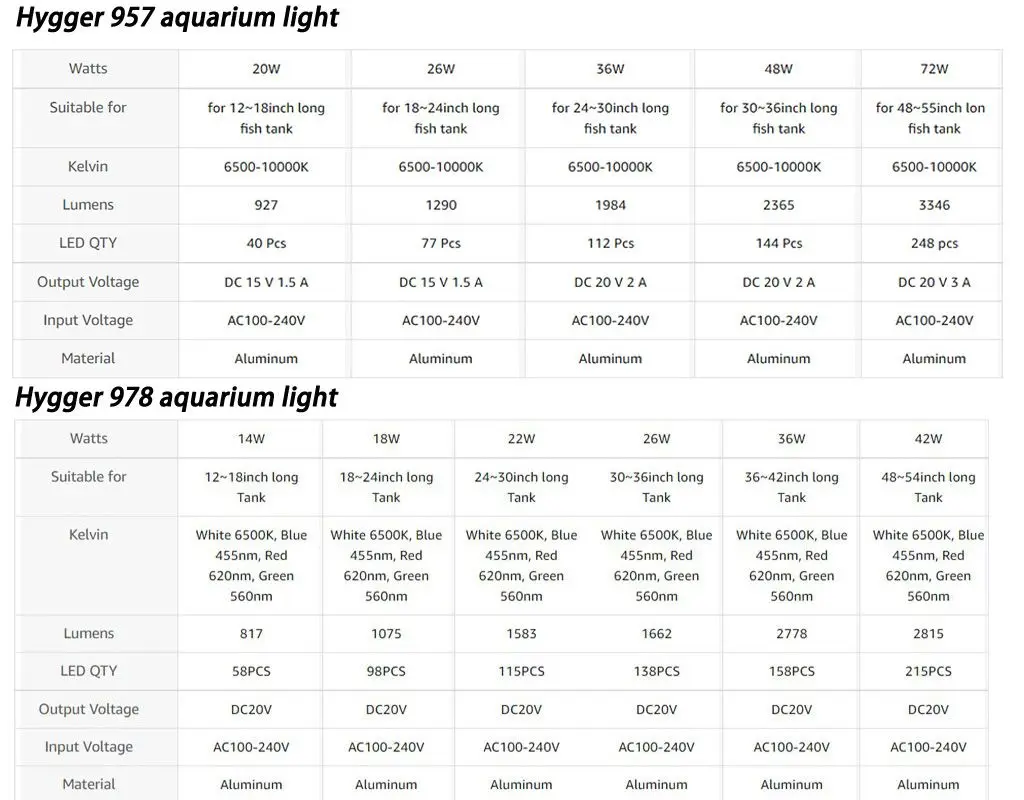
| Suitable tank sizes | 12–55 inches | 12–54 inches |
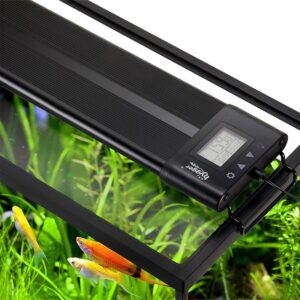
| Waterproof grade: IP 68 | √ | √ |
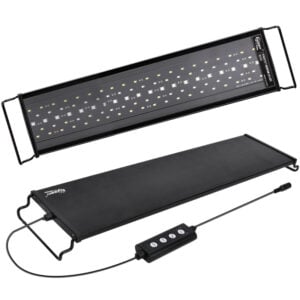
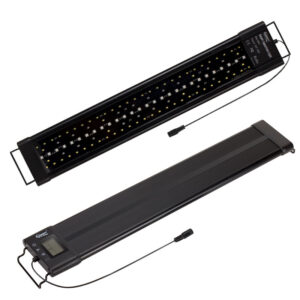
| Extendable brackets | √ | √ |
| Fast heat dissipation | √ | × |
| Power-off memory function | √ | √ |
| Controller | Control panel | Wired controller |
| LCD monitor | √ | × |
| Separable adapter | √ | √ |
| Setting buttons | Four | Four |
| Programming mode | Four modes (default/ DIY/ gradient/ all-day all-optical mode) | Two modes (24/7 mode/ DIY mode) |
| Brightness change | 10 (10%-100%) | 5 (10%/ 25%/ 50%/ 75%/ 100%) |
| Available colors | Varying from four modes | 7 (red/ blue/ green/ purple/ cyan/ orange/ full spectrum light) |
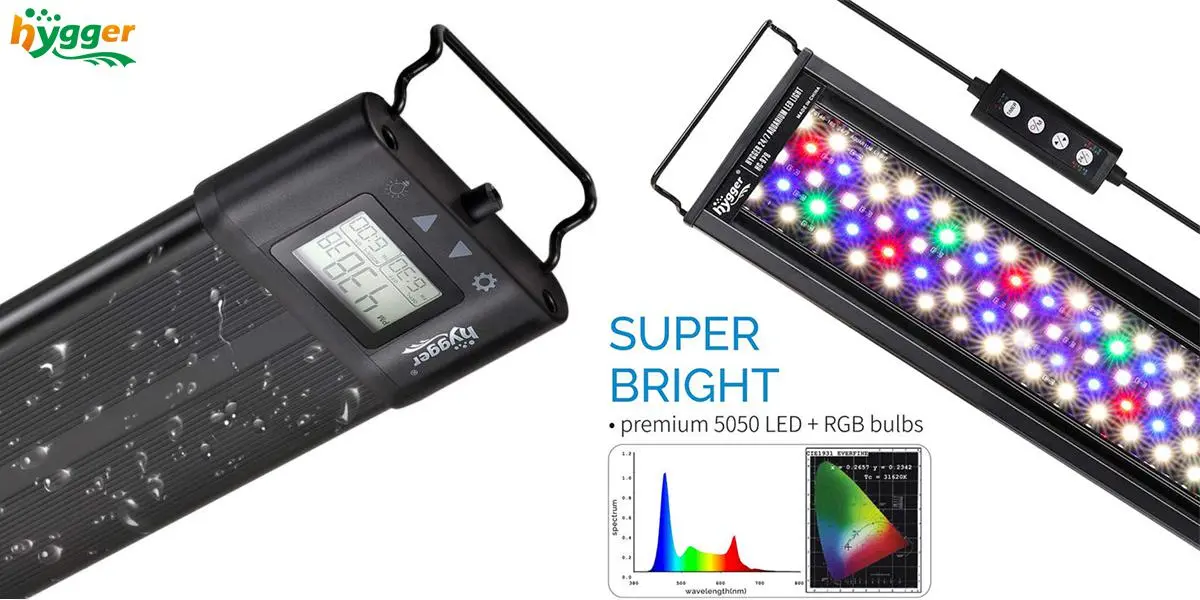
While the 957 and 978 lights have differences, they have something in common, like a detachable adapter. It prevents replacing the LED light because of adapter damage. If the light flashes and then becomes dim, there may be a power problem. For such a case, you should replace the adapter, but you do not need to replace the LED light. Next, we will cover the differences between the two lights in the following segments.
Differences in appearance
1. Ideal for various tank sizes
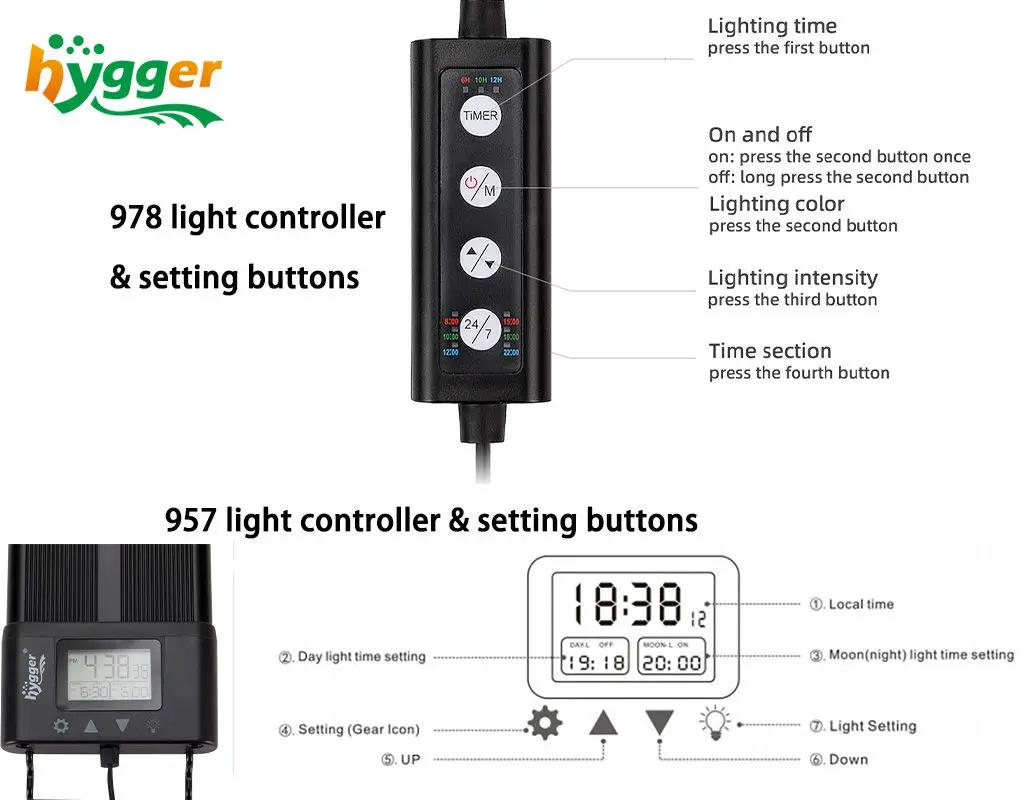
2. Light controller
- 957 light: it has a wireless one – a touchscreen control panel.
- 978 light: it possesses a wired controller.
Light functions differences
| Comparison | hygger 957 aquarium light | hygger 978 aquarium light |
| Setting buttons | ① Setting button (Gear icon): Press the button to enter the setting interface ② Up button: press the button to increase the number ③ Down button: press the button to decrease the number ④ Light setting button: Press the button to set the light color |
① “TIMER” button: press the button to set the lighting time – 6 hours, 10 hours, or 12 hours ② On and off/”M” button
③ Up and down button: Press the button to set the lighting intensity |
| LCD | During the process of local time setting, 24H or 12H and local time will be displayed. Meanwhile, if you set 12H, “PM” will be shown. Moreover, the daylight time setting, moonlight time setting, and start and end time of DIY mode can also be seen on the LCD. In addition, light intensity is also shown. | The 978 light does not have an LCD. |
| Programming modes | ① Default mode ② DIY mode ③ Gradient mode (Cycle mode) ④ All-day all-optical mode |
① 24/7 mode ② DIY mode |
Differences in settings
Available settings for 957 light (Local time setting & Modes setting)
1. Local time setting
- You can choose 12H/24H
- You can also reset the local time
2. Mode setting
(1) The Default mode
- Lighting time
Daylight: 06:30-18:30
Moonlight: 18:00-23:30
- Light intensity (brightness)
Mimics the effect of sunrise to sunset
- Light color
Daylight: full-spectrum white light
Moonlight: blue light (can be adjusted)
(2)DIY mode
- Lighting time: can be set at any time by yourself
- Time stages: L1-L8 (8-time stages)
- Light intensity (brightness): 10 brightness levels (10%, 20%, 30%, 40%, 50%, 60%, 70%, 80%, 90%, 100%)
- Light color: L1-L6: all-optical L7-L8: blue light
(3)Gradient mode (Cycle mode)
- Lighting time & light intensity (brightness): can not be set
- Light color: cycling – dark blue, green, purple, cyan, yellow, and red
(4)All-day all-optical mode
- Lighting time & light intensity (brightness): can not be set
- Light color: RGB light can be adjusted, including blue, red, and green
Available settings for 978 light (Modes setting)
(1)24/7 mode
- Time section: can be set by yourself (Available time section: 8:00/10:00/12:00/15:00/18:00/22:00)
- Light intensity (brightness) & light color: run automatically (can not be set)
In short, if you choose 24/7 mode, you must set the time section.
(2)DIY mode
- Lighting time: you can choose one of the three lighting timers – 6 hours, 10 hours, and 12 hours by pressing the “TIMER” button.
- Intensity (brightness): 5 brightness levels (10%, 25%, 50%, 75%, 100%)
- Lighting color: Seven color options (red/blue/green/purple/cyan/orange/full spectrum light)
By the way, you can get more additional programming information about the two lights in the following two articles – How to Set a Light Timer with hygger 957 Programmable Light and The Most Easiest Tutorial of hygger Aquarium Light Programming is for the hygger 978 Light.
Conclusion
Aside from that, the 957 light fits fish tanks and planted aquariums. It can brighten the fish, but also promote photosynthesis and assist the growth of aquatic plants. On the other side, the 978 light is an excellent alternative to fish-only and planted tanks. It can bring out the colors of your fish and plants. That is all for today. If you have any questions about the lights, please message us in the comments or if to NEED HELP. We are happy to help you out.
Additionally, you can stay tuned to our new releases. Finally, thanks for your reading.
Related Products

I’m setting up a 90 gallon , heavily planted with valisneria and rotala. The tank is 24 inches deep. Would you recommend the 957 be on at 100%? Do you have par measurements for underwater? I think I might need two two of them to get the light spread as well. Thanks!!
You can set the 957 be on at 100% for 6 hours during the daytime, and follow the sunrise, sunset and nighttime.
It has a excellent performance at deep tank.
You can choose the light model according to your tank lenght.
I am a rather experienced fish keeper, and planning to set up a 29 gallon planted tank. I’m trying to decide if I should purchase the Hygger 957 or the HG 129 sun model. What would you recommend?
Both lights are suitable for a 29-gallon planted tank; you can choose one according to the plants in the tank.
If you have mid-to-high light-demanding plants, it is recommended to use the HG957; if there are low-middle-light-demanding plants, the HG129 can meet the need.
Which aquirium light has Bluetooth and a app?
The hygger Aquarium Bluetooth LED Light, has bluetooth and app, can be controlled by mobile phone
Yep, they both have the same V, both 20V but they differ in A. The 957 has 3A while my 978 has 2A only. Is this good? By the way my unit is a 22W hygger HG-978. 24”-30” light.
I check just now, no message from hygger costumer service yet.
Hi Bryan, the 3A adapter can be used as the 978 2A adapter, but using an adapter that is too more A may cause damage to the light chronically, so it is recommended to use a charger that matches the 22W 978 light for charging.
Thanks
hygger team
Good day, I was wondering if you can use the power supply/adapter of 957 to 978?
I just dont like buzzing sound of the power supply of 978 when the light is turned off. Thank you!
Hi Bryan, you can use the 957 adapter to 978 but keep an eye on the size, every adapter has the specific watt, for instance, the adapter is 24W/1.6A of the 957 light 26W while the adapter is 48W/2.4 of the 957 light 36W.
If your 978 adapter is buzz when turned off, please mail to [email protected] for more help.
Thanks
hygger team
Hello, upon checking Amazon in the official Hygger store. The adapter of 957 doesnt have the option to choose what watt are you getting. Its a just a single option/listing for the adapter.
The description states that
“Replacement adapter for Hygger auto on off light HG-957. 20V 2A adapter for 24-36 inches light. 20 volts 3A adapter for 37-55 inches light.”
Do you think this will work on 978?
Hi Bryan,
You can compare the adapter V and A according to the 978 light model’s adapter.
hygger exclusive customer service will mail you for more details and help to solve the problem, please check your mailbox for the mail from hygger.
Thanks
hygger team
Hi,
I am planting some reds and lots of cuba capeting, is the 957 better then the new 076 42wats??
Hi, Carlos Mejia. Actually, 957 42W is not available. But for your tank, 978 42W is better than 076.
Thanks,
hygger team
Can a 957 work for a 60 x 18 x 24 acrylic tank. Thank u.
Hello, Michael. Considering the length and height of your tank respectively are 60 and 24, consequently, a 957 26W is a better option.
That’s it. Hope it can help you out.
Thanks,
hygger team
Hi. I am currently in the process of building a custom made optiwhite glass tank with discus only with some tetras variations and few Cory’s. The tank is 48inch by 24inch by 28 inch. It would be a moderately planted aquarium tank with some echinodorus red rubins ( background ) and ludwiga rubins with some Dwarf hair grass in the foreground. Basically these are all red variants except the hair grass. Non CO2 tank. Which hygger model would suit best between the 957 and 978?
Hello, Raja De. 957 would suit best for your tank exactly. There are foreground and background aquatic plants in your tank, and most are red variants. Hence, more accurate light settings is necessary. Compared with 978, 957’s DIY mode has more light settings.
That’s it. Hope it can help you.
Thanks,
hygger team
Hi,
Why is the 978 better for fish only aquariums?
Hello, Caro. In simple terms, it is just because 978 is easier to program compared with the 957 light. It may sound ridiculous. Actually, both 978 and 957 light can be used in fish tanks and planted tanks.
White light enhances the color of plants and fish, red light makes fish’s colors more vibrant, and blue light is helpful to calcium absorption. The wavelength of 978 and 957 is similar. So, the main difference between 978 and 957 is the mode settings.
However, the requirements of light on fish are not as demanding as aquatic plants. So, compared with 957 light, 978 is the better one for fish-only aquariums.
That’s it. Hope it can help you out.
Thanks,
hygger team
I have a 45 gallon (36 inches long) planted tank with community fish. A few red plants which require moderate to high lighting. 957 or 978 would be better choice?
Hello, Joe. Actually, 957 would be the better choice. Moderate to high lighting requires about 807-1614 lux of the light. Also, though both 957 and 978 can be used in planted tanks, the latter is better for fish-only tanks.
That’s it. We hope it can help you out.
Thanks,
hygger team