$0.00
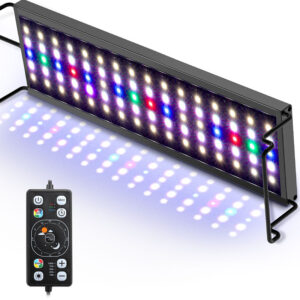
How to Set a Light Timer with Hygger 957 Programmable Light
Hey, dear friends! Have you ever been confused about programming the Hygger 957 aquarium light? In this article, we will get into a specific introduction about how to set a light timer with the Hygger 957 aquarium light.
Content Table
Features of Hygger 957 aquarium light
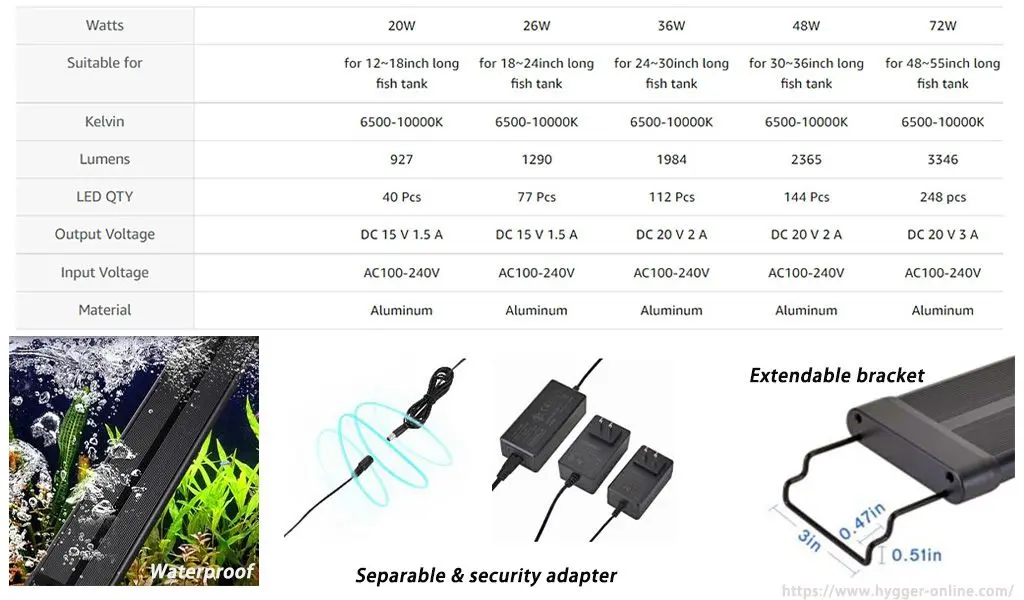
1. Suitable for various tank sizes
The 957 is suitable for tank sizes from 12-55 inches long. Provided your tank size is within this range, it is feasible to choose the hygger 957 for your aquarium.
2. Waterproof
The hygger 957 aquarium light features a waterproof grade of IP68, high light transmittance, easy to clean, as well as pure and transparent light. Moreover, although used for the long term, it will not decay. It possesses a long lifespan of tens of thousands of hours, at least 50,000 hours.
3. Separable and security adapter
It prevents replacing the LED light because of adapter damage. If the light flashes and then becomes dim, there may be a power problem. For such a case, you should replace the adapter.
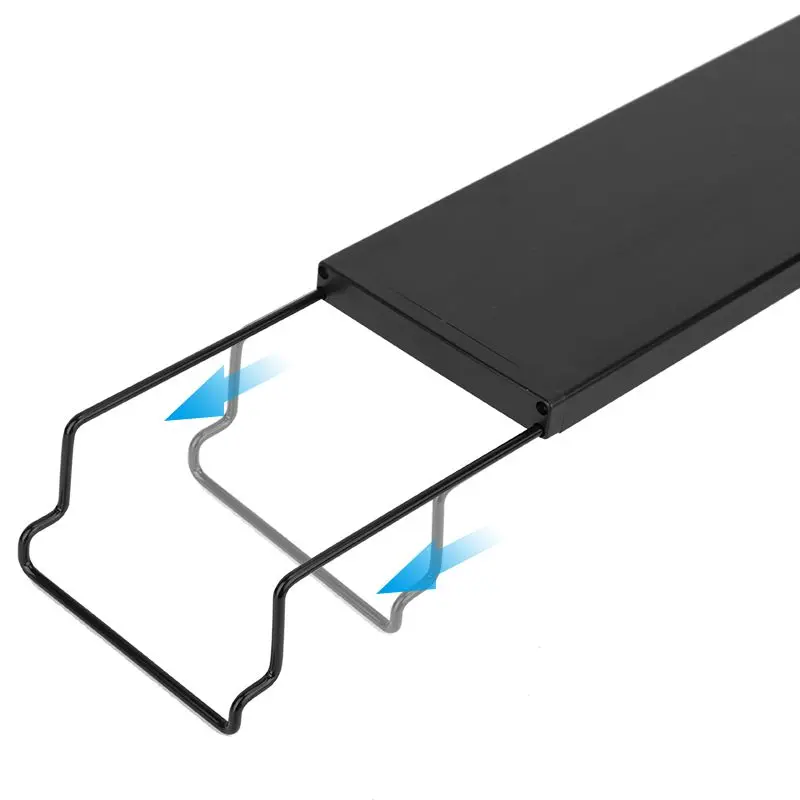
4. Extendable bracket
The bending bracket is extendable and can be adjusted in length. Meanwhile, it is easy to install as a fish tank hood.
5. Power off the memory function
Provided that the power is suddenly shut off, once the power is restored, the settings of the light remain before closing the power. And the local time of the light defaults to 24:00.
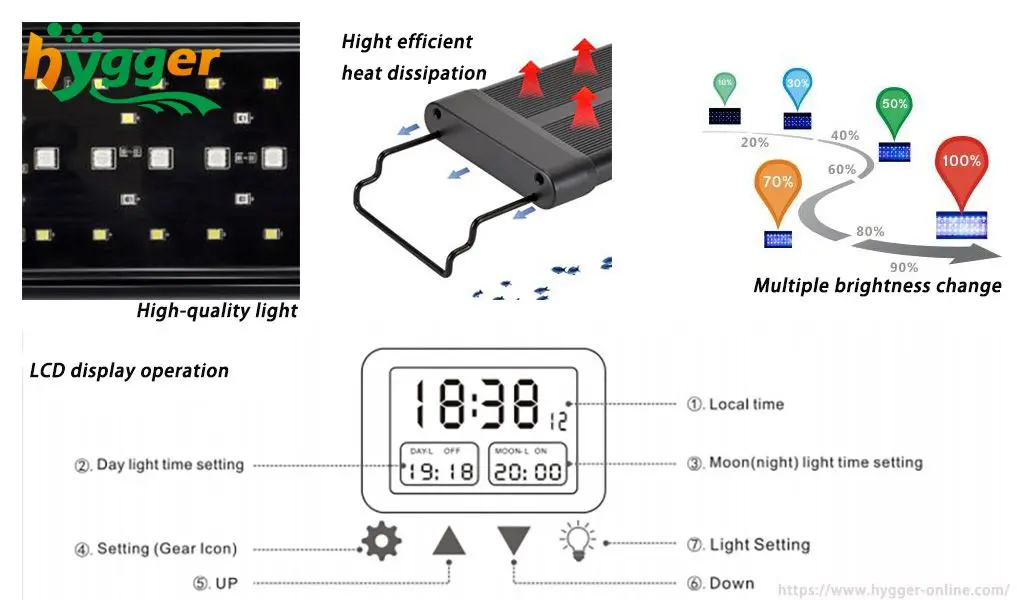
6. High-quality light
The rendering index is up to 89 percent. With soft irradiated light, your eyes get protected. Besides that, the stable and more natural light is beneficial to fish in your aquarium. Furthermore, the high-quality lamp beads of the 2835+5050 model are applied.
7. High efficient heat dissipation
The fin design and aluminum with 0.05 inches thick improve the heat dissipation area. One more thing you should notice here. The aluminum surface of the aquarium light will appear heat, that is because there is a heat dissipation sticker between the lamp bead and the aluminum material, but there is no gap. However, the heat will not be stored in the light, but rather be radiated outside directly. Since the residual heat will damage the lamp beads, decay the light, and even damage the power supply.
8. Multiple brightness change
There are 10 adjustable brightness, which simulate the effect of sunrise to sunset. It can brighten the fish. On the other hand, it promotes photosynthesis, accordingly, the aquatic plants in your aquarium get better living conditions.
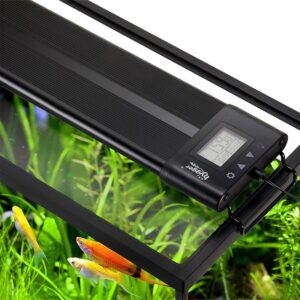
9. LCD operation
The display shows the local time, which is accurate to the second. In addition to this, the display also shows the start and end times of daylight and moonlight mode. There are also four buttons, including mode setting, up, down, and light setting buttons.
Four programming modes
There are four modes of the Hygger 957 aquarium light, including Default mode, DIY mode, Gradient mode, and All-day all-optical mode. Next, we will make a brief introduction to these four programming modes.
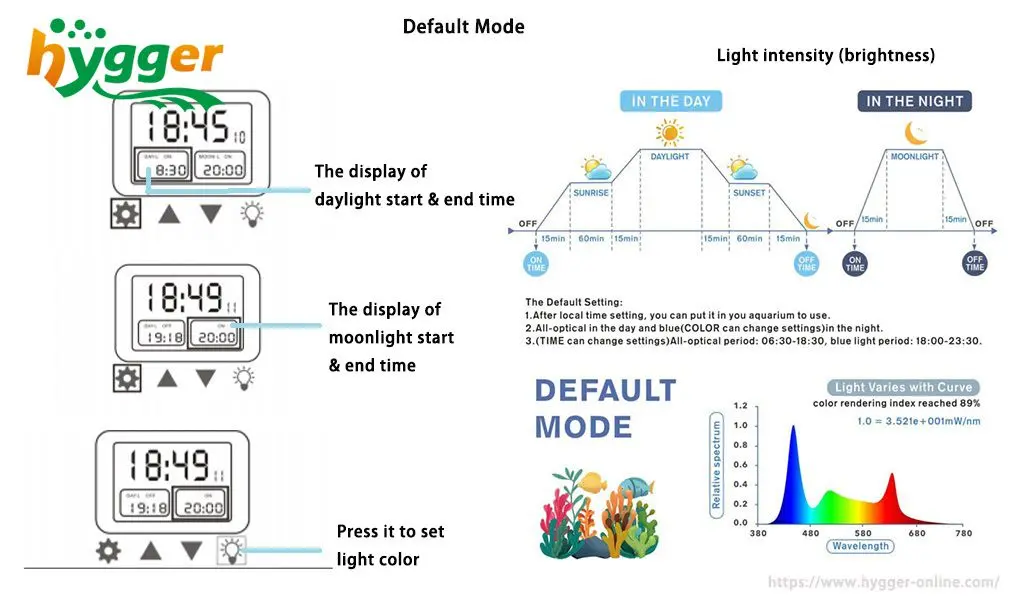
1. Default Mode
| Option | Daylight | Moonlight |
| Lighting time | 06:30-18:30 | 18:30-23:30 |
| Light color | full spectrum white light | blue light (can adjust) |
| Light intensity (brightness) | mimics the effect of sunrise to sunset | mimics the effect of sunrise to sunset |
Tips:
- The start and end times of daylight and moonlight can be reset.
- The light color of moonlight can be adjusted, including dark blue, green, purple, cyan, yellow, and red.
2. DIY Mode
| Time stages | 8-time stages (L1-L8) |
| Lighting time | can be set any time by yourself |
| Light intensity (brightness) | 10 brightness (10%, 20%, 30%, 40%, 50%, 60%, 70%, 80%, 90%, 100%) |
| Light color | all-optical (L1-L6) blue light (L7-L8) |
Tips:
- The start and end times of each time stage can be set by yourself.
- Only a brightness can be set in each time stage.
- The light will not turn off immediately at the end time of the last time stage. On the contrary, it will turn off completely after 15 minutes. During the 15 minutes, the light will dim slowly. By so, it provides a buffer stage for your fish, or your fish may get scared of suddenly closing the light.
- The DIY mode is suitable for planted tanks.
3. Gradient Mode (Cycle Mode)
- Turn off the DAY-L and Moon-L, the light will continue to cycle. Moreover, the cycle mode also keeps running in next day.
- Lighting time: can not be set.
- Light intensity (brightness): can not be set.
- Light color: adjust the light color to dark red and wait for about 20 seconds, then the light will begin cycling the color – dark blue, green, purple, cyan, yellow, and red.
4. All-day all-optical mode
- Lighting time & light intensity (brightness): can not be set.
- Light color: you can fine-tune the color of RGB light, including blue, red, and green.
How to program Hygger 957 aquarium light
At present, you have learned the basic information about the Hygger 957 aquarium light. In this segment, we will guide you on how to program the light.
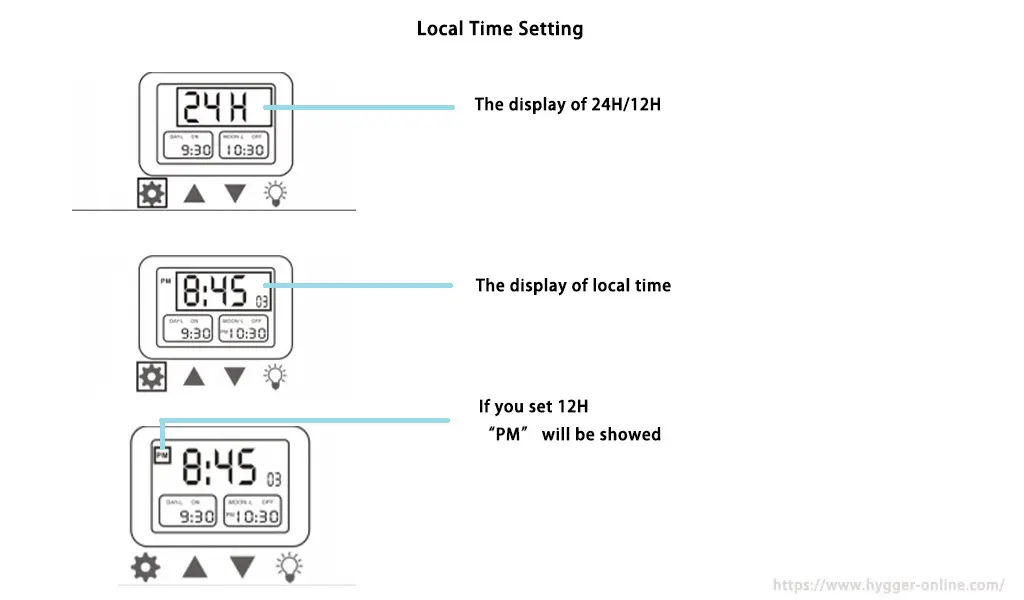
Local time setting
(1) 24H/12H
- Long press the “Setting” button.
- When the “24H” flashes in the display, then press the “Up” and “Down” buttons to choose 12H or 24H.
(2) Hour
- Press the “Setting” button.
- When the “Hour” flashes in the display, press the “Up” and “Down” buttons to choose the “Hour”.
(3) Minute
- Press the “Setting” button.
- When the “Minute” flashes in the display, then press the “Up” and “Down” buttons to choose the “Minute”.
- Finally, press the “Setting” button to confirm.
Besides that, if you choose “12H”, “PM” will be shown on the display.
Default Mode
(1) Lighting time
Minute:
The same as the above ‘Minute’ setting
| Daylight time setting | Start time | Press the “Setting” button once, when the “DAY-L” flashes, long press the “Setting” button to enter the edit mode, and then the “DAY-L ON” will show on the display. | Hour: Press the “Setting” button, when the “Hour” flashes, press the “Up” and “Down” buttons to choose the “Hour” |
Minute: Press the “Setting” button, when the “Minute” flashes, press the “Up” and “Down” buttons to choose the “Minute” |
| End time | Press the “Setting” button, then the “DAY-L OFF” will flash. | Hour: When the “DAY-L OFF” flashes, the “Hour” also flashes. Then press the “Up” and “Down” buttons to choose the “Hour” |
Minute: The same as the above ‘Minute’ setting |
|
| Moonlight time setting | Start time | Press the “Setting” button twice, when the “MOON-L” flashes, long press the “Setting” button to enter the edit mode, then the “MOON-L ON” will flash. | Hour: Press the “Setting” button, when the “Hour” flashes, press the “Up” and “Down” buttons to choose the “Hour” |
Minute: The same as the above ‘Minute’ setting |
| End time | Press the “Setting” button, then the “MOON-L OFF” will flash. | Hour: When the “MOON-L OFF” flashes, the “Hour” also flashes. Then press the “Up” and “Down” buttons to choose the “Hour” |
Minute: The same as the above ‘Minute’ setting |
(2) Light color
Press the “Light setting” button, then you can choose one of the colors, including dark blue, green, purple, cyan, yellow, and red.
(3) Light intensity (brightness)
The light intensity will be changed by the curved design, which simulates the effect of sunrise to sunset.
DIY Mode
(1) Enable the DIY mode
- Press the “Setting” button and the “Light setting” button at the same time until the display shows “OFF”.
- Press the “Up” and “Down” buttons to choose “ON”.
- Then press the “Setting” button to confirm.
(2) Lighting time and brightness for each stage
| Stages | Light intensity (brightness) | Lighting time |
| L1 |
|
Start time
End time
|
| L2 |
|
End time
|
- L3-L8: The programming steps are the same as “L2”.
By the way, you can temporarily change the light intensity following these steps:
- Press the “Setting” button to select a specific color.
- Press the “Up” and “Down” button to change the light intensity for the specific color.

Gradient Mode (Cycle Mode)
(1) Turn off the DAY-L and Moon-L
- Press the “Setting” button once, when the “DAY-L” flashes, long press the “Setting” button, then the “DAY-L ON” will show on the display. Next, press the “Up” and “Down” buttons to turn DAY-L OFF. Then the display will show “DAY-L OFF”, finally press the “Setting” button to confirm.
- Press the “Setting” button twice, when the “MOON-L” flashes, long press the “Setting” button, then the “MOON-L ON” will show on the display. Next, press the “Up” and “Down” buttons to turn MOON-L OFF. Then the display will show “MOON-L OFF”, finally press the “Setting” button to confirm.
(2) Lighting time & brightness
Can not be set.
(3) Light color
Press the “Light setting” button once, then press the “Light setting” button to switch the color to dark red and wait for about 20 seconds, then the light will begin cycling the color – dark blue, green, purple, cyan, yellow, and red.
All-day all-optical mode
(1) Lighting time & brightness
Can not be set.
(2) Light color
Press the “Light setting” button twice, then press the “Light setting” button to fine-tune the color of the middle array of RGB light.
Reminder
For better use of hygger 957, here are also some tips for you!
- Restore the factory setting
Provided that the settings are wrong or confusing, you can restore the factory settings. In the non-DIY mode, long press the “UP” and “DOWN” buttons at the same time for a few seconds, once the “SOP” appears in the display, then unplug the power. After that, you can plug in the power again and reset it.
- Turn the light off
Long press the “Light setting” button until the light goes off.
- Turn the light on
When the light is off, press the “Light setting” button.
After reading, we believe you have learned how to set the Hygger 957 aquarium light. For more impressive functionalities in this light, the expert review of hygger 957 can provide an in-depth analysis for you.
Nevertheless, if you have any other questions, please leave your message on NEED HELP, Hygger is glad to give your hands.
I have my Hygger 957 time of day set. I want to set DYI. So have it coming on at 9:30 AM on T1 and off at 1:00 PM. Want it to come back in T2 at 4:00 PM. I set that. But how do I set what time it goes off in T2. I just want to 2 time settings. Off for the day at 8:00 PM.
Hi Charles Valis, at DIY mode, you can set any time by yourself.
After you set the T2 open time at 4:00 PM, you can set the T2 off time at 8:00 PM by press the “Setting” button.
When the “Hour” flashes in the display, then press the “Up” or “Down” buttons to choose the “Hour” on 8:00 PM.
And the light will not turn off immediately at the end time of the last time stage. On the contrary, it will turn off completely after 15 minutes. During the 15 minutes, the light will dim slowly.
Any questions, please mail to [email protected]
Thanks
hygger team
What time does the default light come on and turn off?
Hi, Charles Valis. If your light runs on a preset timer under default mode. The Daylight time will be from 06:30 am to 6:30 pm, and the Moonlight will be from 6:30 pm to 11:30 pm. But you can also set the time you want.
That’s it. Any questions about hygger products, welcome to contact us.
hygger team
Is the display back light able to be dimmed? Thanks
Hi, Jake. It cannot be dimmed.
Thanks,
hygger team
Every time I try to change the light color for L2 after setting L1 it just takes me back to the beginning, it’s frustrating I don’t know what I’m doing wrong, please help
Hi, Dawn. The light color under DIY mode can not be set. The light color of L1-L6 and L7-L8 respectively are all-optical and blue.
That’s it. Hope it can help you out.
Thanks,
hygger team
Can I set my HG957 for a sunrise to sunset cycle with the lights? I’m having difficulty trying to get it set, sorry I’m new to having fishes
Hello, Dawn. You can just choose the Default mode, which mimics the effect of sunrise to sunset.
Thanks,
hygger team