Dear friends, have you ever been confused about fish feeding when you go out on a holiday or business trip? If so, the Hygger 967 auto fish feeder will help you. It will feed your fish with programmable time and portion. You do not need to worry about whether your fish will get hungry! This article will introduce the auto fish feeder and cover how to program it.
Content Table
The following is the hygger 967 fish feeder setting video from Gabriel who is a customer of the hygger Amazon store. His comment on the product is helpful for many other customers and is recommended by Steve, who is another customer of the hygger. Thanks to both of them.
“We bought this last year on may 14 and we been using it ever since it’s been working for almost a year now And hasn’t malfunction even when the power goes out.It doesn’t lose track of time or the programming.
The only problem we had was setting up the timer it was difficult for me, that’s why I made this video n how To set up the timer just in case you’re having trouble also. I highly recommend this fish feeder.”
Introduction of Hygger 967 auto pond fish feeder
Features of Hygger 967 auto pond fish feeder
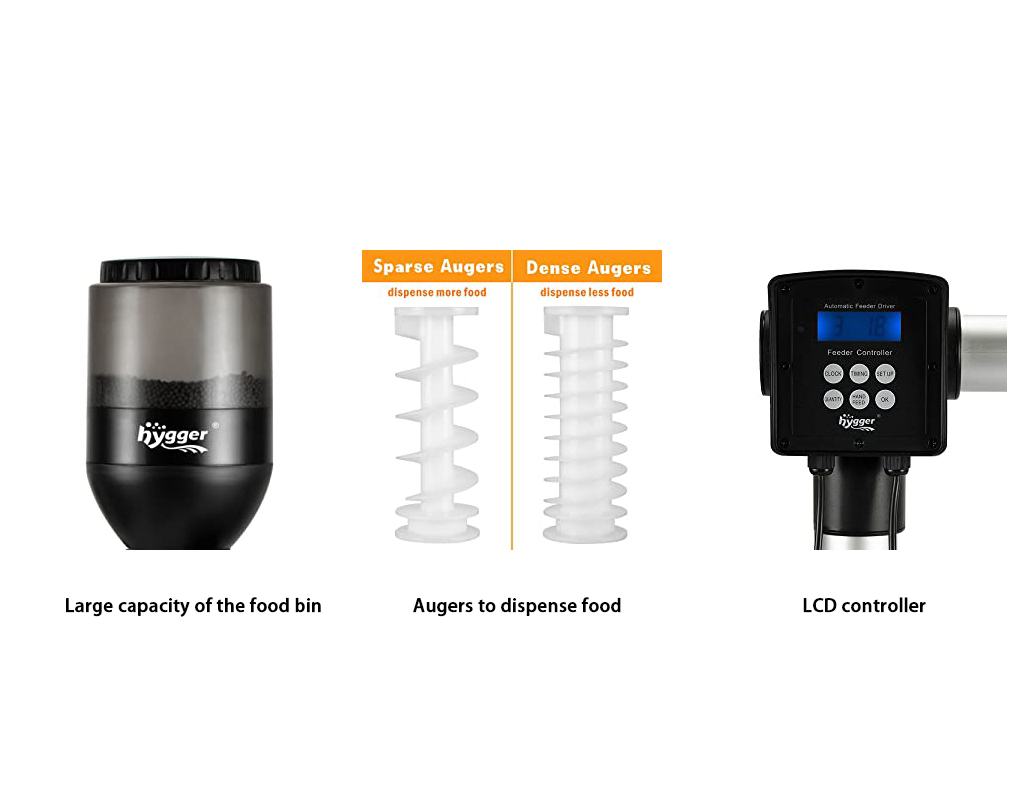
- Large capacity of the food bin
The capacity of the food bin is 5.5 liters. If it is with a full load of food, it can feed your fish for several weeks, depending on the number and size of fish you keep. Besides, you can see the remained amount of food in the food bin. Because it is made of ABS plastic and is transparent. Besides, you can refill the food bin after you open the lid.
- Augers to dispense food
There are two shapes of augers, including sparse and dense augers. You can choose one according to the quantity of feeding. The sparse auger dispenses more food than the dense auger. For example, one portion of 6 mm pellets drops about 11 grams of food through the narrow one (the dense auger), while it drops 36 grams of food through the wide one (the sparse auger). Moreover, it is easy to replace the auger. What you need to do is to open the lid, and then replace the auger, and finally close the lid. To keep the raccoons out, you can tape the lid.
- LCD controller
You can set and adjust the clock, feed times, feed portions, and timings easily. You can hang the controller on the pole of the feeder after you finish the settings. But the controller is not waterproof. So it is better to put it in a shelter to protect it from rain or snow. Furthermore, the feeder can feed six times each day, with 0-9 feeding portions each time, as well as each portion lasts 8 seconds. One portion drops approx from 11 to 36 grams. There is also a manual feeding button, “HAND FEED” for instant feeding.
- 16 feet long wire
The electric wire does not need a battery, and it is 16 feet long. Besides, it requires less maintenance, just wipe it to keep it clean. And you can try to plug it into a power strip to extend the cord.
- Feed your fish automatically
You can set the feed time and portion in advance, and then it will dispense food automatically at that time. Besides, it is weatherproof and safe from wildlife, such as rats, foxes, raccoons, and squirrels.
- Memory function
The fish feeder can restore previous settings for memory function.
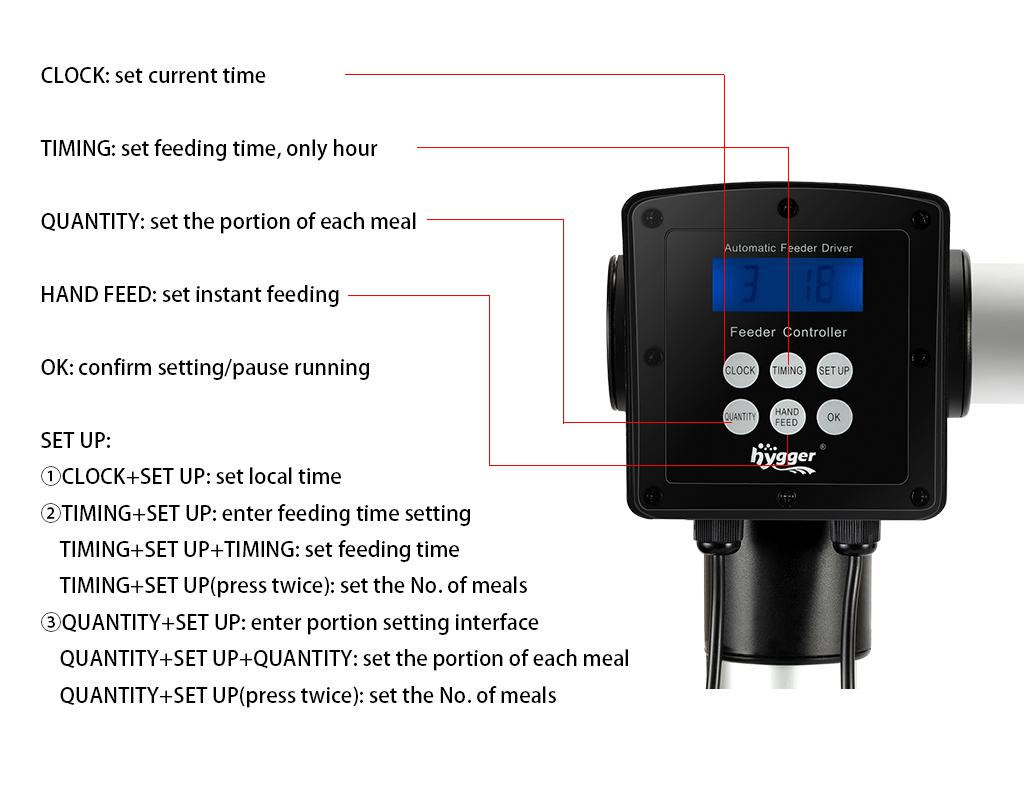
Functions of the buttons
Before introducing how to program the fish feeder in detail, we would like to introduce the functions of the buttons in the controller. There are six buttons, including CLOCK, TIMING, SETUP, QUANTITY, HAND FEED, and OK buttons.
- CLOCK: Set the local time.
- TIMING: Set the feeding time (hour).
- SET UP: Combining settings with other buttons.
- QUANTITY: Set the portion of each meal.
- HAND FEED: Button to set instant feeding.
- OK: Confirm your setting or pause running.
How to program Hygger 967 auto pond fish feeder
1. Set the current time
- Press the “CLOCK” button, then press the “SET UP” button to enter the time setting interface
- Hour: Press the “CLOCK” button to set the “hour”
- Minute: Press the “TIMING” button to set the “minute”
- Press the “OK” button to confirm your setting
For example, if it is 17:17 now, you can press the “CLOCK” button, then press the “SET UP” button. After that, press the “CLOCK” button to choose “17”, and press the “TIMING” button to choose “17”. Finally, press the “OK” button to confirm.
2. Set the meals and scheduled feed time
- The first meal and the feed time: Press the “TIMING” button, then press the “SET UP” button to enter the feed time interface. When the “feed time/hour” flashes, press the “TIMING” button to set the hour of the FIRST meal.
- Set the second meal and the feed time: Press the “SET UP” button again to set the second meal. Then press the “TIMING” button to set the hour of the second meal.
- The setting of other meals and feed time is the same as the setting of the second meal.
- After finishing the settings, press the “OK” button to confirm.
Tips: The feed time can only be programmed to “hour”. And the broken line in the display means that nothing has been set.
For example, provided that you want to feed your fish for the first meal at 6:00, and the second meal at 18:00. Press the “TIMING” button, then press the “SET UP” button. When the “feed time/hour” flashes, press the “TIMING” button to choose “06”. Then press the “SET UP” button again to choose “2” and press the “TIMING” button to choose “18”. And press the “OK” button to confirm.
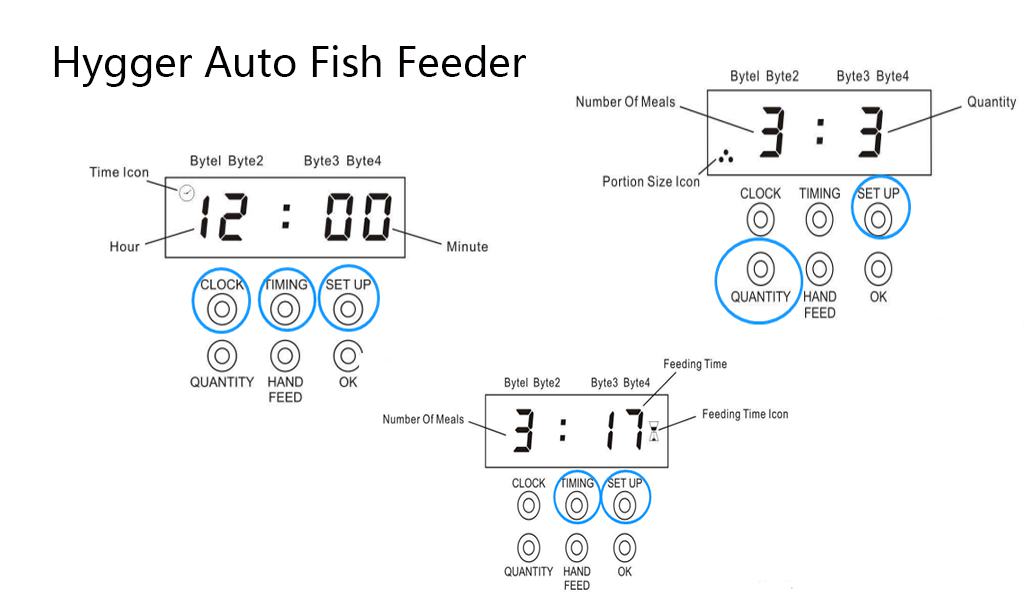
3. Set the portion of each meal
- Press the “QUANTITY” button, then press the “SET UP” button to enter the portion setting interface. Press the “QUANTITY” button to set the portion of the first meal.
- Press the “SET UP” button to choose the second meal, and then press the “QUANTITY” button to set the portion of the second meal.
- The portion setting of other meals is the same as the proportion setting of the second meal.
- After finishing settings, press the “OK” button to confirm
Tips: The break in the setting means that the feed quantity is zero.
For example, if you want to feed 4 portions for the first meal, and 3 portions for the second meal. You can press the “QUANTITY” button, then press the “SET UP” button. After that, press the “QUANTITY” button to choose “4”. And then press the “SET UP” button to choose “2” and press the “QUANTITY” button to choose “3”. Finally, press the “OK” button to confirm.
4. Set instant feeding
- Press the “HAND FEED” button when you want to feed now. And you can also press the “HAND FEED” button to pause.
5. Pause function of automatic feeding
- Pause: Press the “OK” button to pause automatic feeding, and the indicator light will flash.
- Continue: Press the “OK” button to cancel the pause, and the feeder will continue running.
Tips for better using the Hygger 967 auto pond fish feeder
- Do not submerge the feeder underwater or get the feeder wet, or it will be damaged. You can just wipe it to keep it clean.
- Don’t install the feeder in the mud. Drill 4 holes in the stone, wooden or ceramic floor with an electric drill, and fix the base with 4 screws. Besides, the feeding port should point to the water’s surface.
- Do not put fish flakes or fish food less than 4 mm into the food bin. It is unable to dispense the flake food. And the fish food less than 4 mm will be dropped out of the feeder right away. It is ideal for 4-10 mm sticks or stick food.
- Before you change the screw stem (the auger), you should make sure the food bin is empty, and the feeder is unplugged. And do not put your hands into the food bin when it is running.
- The fish food you put into the food bin should be less than 5 pounds.
After reading, we believe you have known more about how to program the Hygger 967 auto pond fish feeder. If you have any other questions, please leave your message on NEED HELP, Hygger is glad to help you out! And thanks for your reading!
Fish feeder FAQs
– If there is one problem of too much for a single feeding, how to solve it?
– For this problem, here is a temporary solution. You can get a good quality electric tape and wound it around the flutes. By doing so, the feed volume will be reduced, which is the same effect as shortening the feeding time. On the other hand, the tape reduces the size of the flutes. You can put about one whole roll and reduce the lowest servings by 85%.
– If there are extension cords for outdoor use?
– We don’t have extension cords from the controller to the feeder at present. Maybe you can try to plug it into a power strip.
– Can you set the feeding frequency to every other day?
– No! The fish feeder must be set to feed at least one feeding per day.
– How to reduce feeding quantity?
– You can use the dense augers to dispense less food as you need. Also, just set a lower portion of each meal by pressing the “QUANTITY” button.
Related Products
I set up my feeder. When I press auto feed it does not turn. I think it is defective. HELP The light turns solid when I press auto feed the light flashed when I hit pause. The auger is NOT spinning.
Hi Ann,
For the issue, hygger customer service will reach out to you and help you solve it.
We will be waiting for a reply from your mail.
Thanks
hygger team
I can not make any changes to the controller nor the feeding quantity. Time does not change after following the manual paper / online.
Clock goes back to 45:85 after putting in the current time.
Need to talk to someone to get a new controller sent ASAP.
Hi Stephen Kesler,
For the issue, hygger customer service will reach out to you and help you solve it.
We will be waiting for a reply from your mail.
Thanks
hygger team
I just set up your feeder and it is wonderful. It is well made and the best product available on the market. Unfortunately, the written instructions are difficult to understand in English. There is an excellent video showing how to program your controller on Amazon’s reviews. It is a five-star review dated May 15, 2022, that is entitled “Reliable”. You might consider posting a link to this review on your website. Thank you again for making an outstanding high-quality feeder.
Hi Steve,
Thanks for your kind suggestion and affirmation.
We’ve added the setting video into the post, hope it helps for more customers.
Thanks
hygger team
what are the steps on clearing errors code on feeder
Hi Mark Guzman,
About the steps on clearing error code on feeder,
hygger customer service will reach you out to solve the issue.
Please check the mailbox lately.
Thanks
hygger team
What does 4 asteriks on the display mean?
Hi George Gillespie,
Please shoot a video of the issue to mago@hygger-online.com, hygger exclusive customer service is waiting to help you.
Thanks
hygger team
I emailed them two days ago and haven’t heard anything. I checked my spam folder and didn’t find any responses there.
Hi Meg Chase,
Sorry for the inconvenience caused to you.
The hygger exclusive customer service has mailed to you to help solve the issue, please check your e-mail.
Thanks
hygger team
Is there any way to get replacement parts? I need a new power plug. Or can I buy just the whole controller piece?
Hello, Meg. Please mail to mago@hygger-online.com. hygger exclusive customer service is ready to help you out.
Thanks,
hygger team
Is there any way possible to set to Fred every other day? Thanks, Kathleen
Hi Kathleen, the fish feeder must be set to feed at least one feeding per day.
hygger exclusive customer service is ready to help you now, any questions about hygger please mail us via mago@hygger-online.com
Thanks
hygger team
How do I cxl a feeding time . I only need two and I have 3. Or reduce the quantity?
Or reset the feeder
Hi Stephanie cloud, you can use the dense augers to dispense less food as you need. And set the portion of each meal to ‘2’ by pressing the ‘QUANTITY’ button.
Any questions about hygger products, please feel free to contact us at mago@hygger-online.com.
hygger exclusive customer service always waiting for you.
Thanks
hygger team
How much food is in the lowest feeding amount? I realize it depends on the shape of the food. However, I’m looking for a ballpark.
Is it like one cup to cups?
Hi Bruce, yep, it depends on the shape of the food, for example, one portion of 6 mm pellets drops approximately 11 grams through a narrow auger, while through a wide auger, it drops 36 grams. The fish food you put into the feeder should not weigh over 5 pounds.
Thanks
hygger team