$0.00
How To Program Hygger 999 Aquarium Light
One suitable light is beneficial to the growth of your little fish, plants, and other creatures in your aquarium. On the other hand, perfect lights for tanks also improve their ornamental value. Today, we will introduce Hygger 999 aquarium light, which is suitable for freshwater fish and aquarium plants, but it is not perfect for saltwater use.
Content Table
Introduction of Hygger 999 aquarium light
Features of Hygger 999 aquarium light
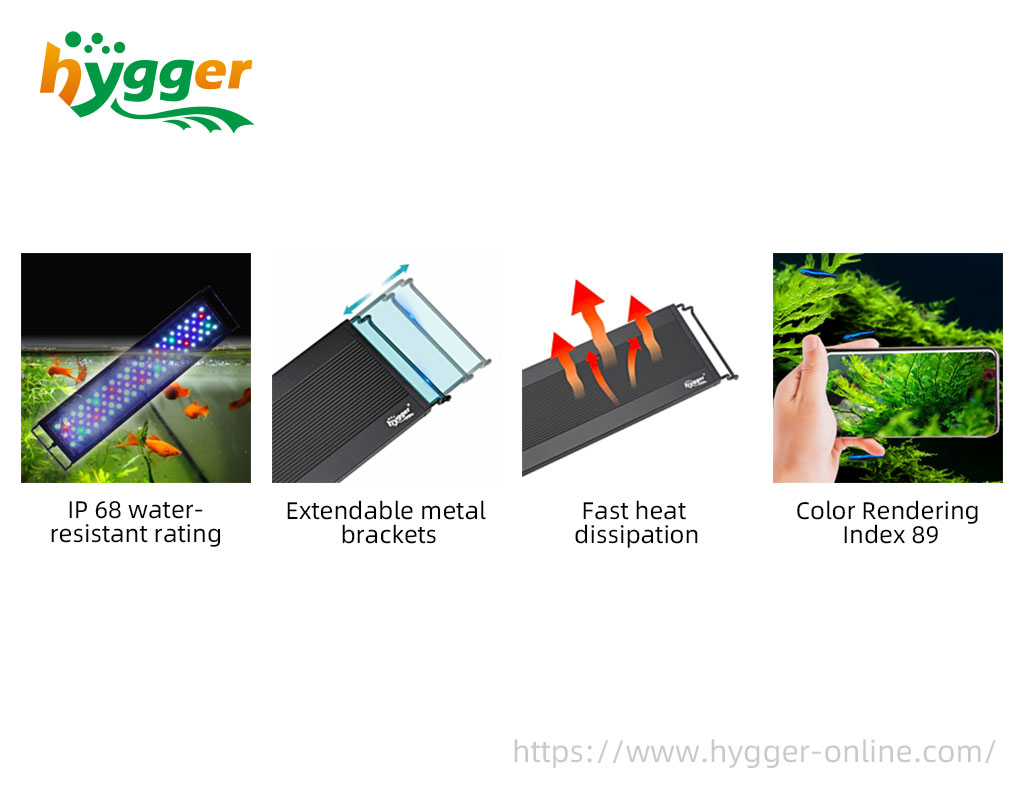
1. IP 68 water-resistant rating
The fully sealed process protects the light from humidity and water intrusion. And you do not need to worry about splashing or accidentally falling into the water.
2. Extendable metal brackets
The metal brackets are adjustable, which makes the light fit different sizes of aquariums.
3. Fast heat dissipation
The 1.2mm aluminum alloy metal shell promotes the effectiveness of heat transfer, so the heat dissipation of the light is good. Besides, there is no fan, and a low voltage DC adapter, which makes the light safe to use and energy-saving.
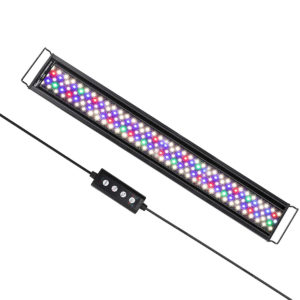
4. High-quality LED aquarium light
The color rending index is 89, and flicker-free LED is stable and provides enough brightness for viewing.
Besides, the WRGB lamp beads are applied to the LED aquarium light. By scientifically adjusting, the three primary colors simulate natural light without flickering. It boosts the growth of water plants and makes the water more sparkly clean from a visual. Moreover, the ultra-bright LED light is beneficial to green aquarium plants, and is ideal for freshwater fish and aquarium plants of low light but high brightness.
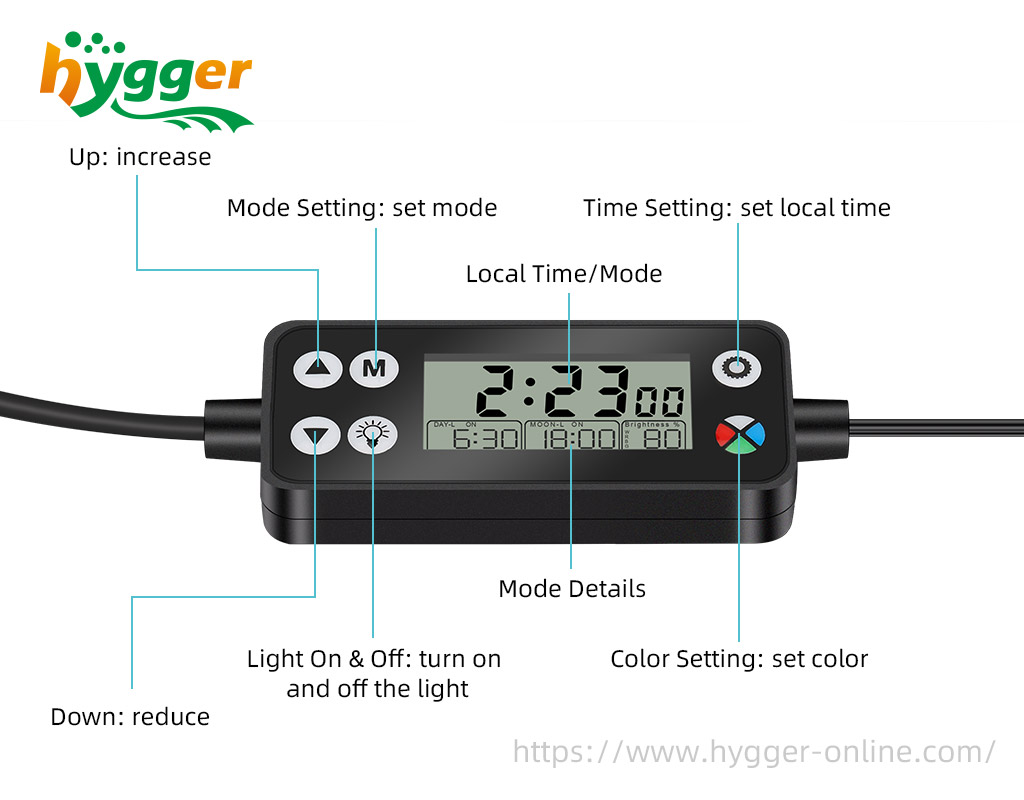
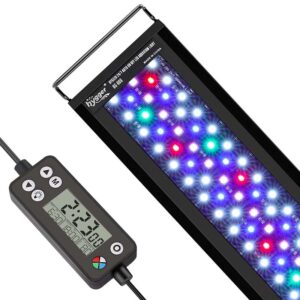
5. Wired controller with LCD monitor
There is a clock on the controller, which is for 24 hours setting. When time is up, the light will auto on and off. You can see detailed information on the LCD, including current time, current mode, start and end time of running, current light color, and brightness. Besides, there are six setting buttons, so you can set the working mode quickly.
Moreover, the light has a power-off memory function for the use of an IC memorizer. The setting of the aquarium light will not lose after resuming work.
Programming Mode
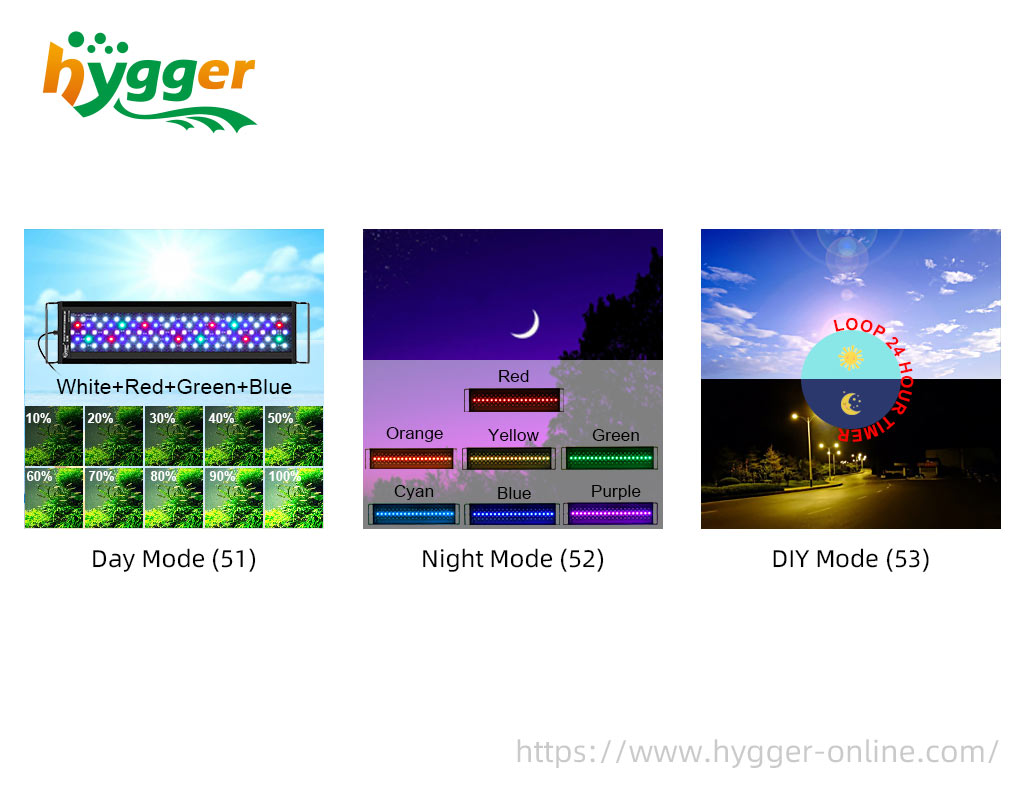
There are three main modes of the Hygger 999 aquarium light, including DIY mode (53), Day mode (51), and Night mode (52).
1. Day Mode (51)
- Time: You can set it freely according to your needs.
- Light: The white light (W+R+G+B) will be displayed in day mode. It will slowly turn on or off within 15 minutes when the day mode works.
- Besides, the brightness of the white light can be set from 10% to 100%.
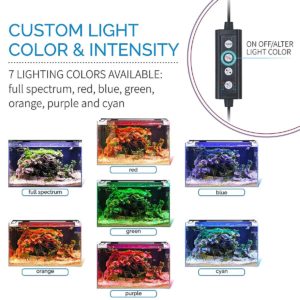
2. Night Mode (52)
- Time: You can set it freely according to your requirements.
- Light color: Seven colors can be set in night mode, including red, orange, yellow, green, cyan, blue, and purple. You can set one of them. Besides, it will slowly turn on or off within 15 minutes when the night mode runs.
3. DIY Mode (53)
- Period: It has 8 time periods, namely L1-L8 periods. And it covers 24 hours.
- Settings: The following selections of each period can be set from your preferences, including the start time, end time, light color, and brightness. Besides, the light will display the light color and brightness according to your setting in each period.
How to program Hygger 999 aquarium light
For this part, we will cover detailed information about how to program the Hygger 999 aquarium light.
But just to be clear in advance, the relevant information about Hygger 999 aquarium light is as follows:
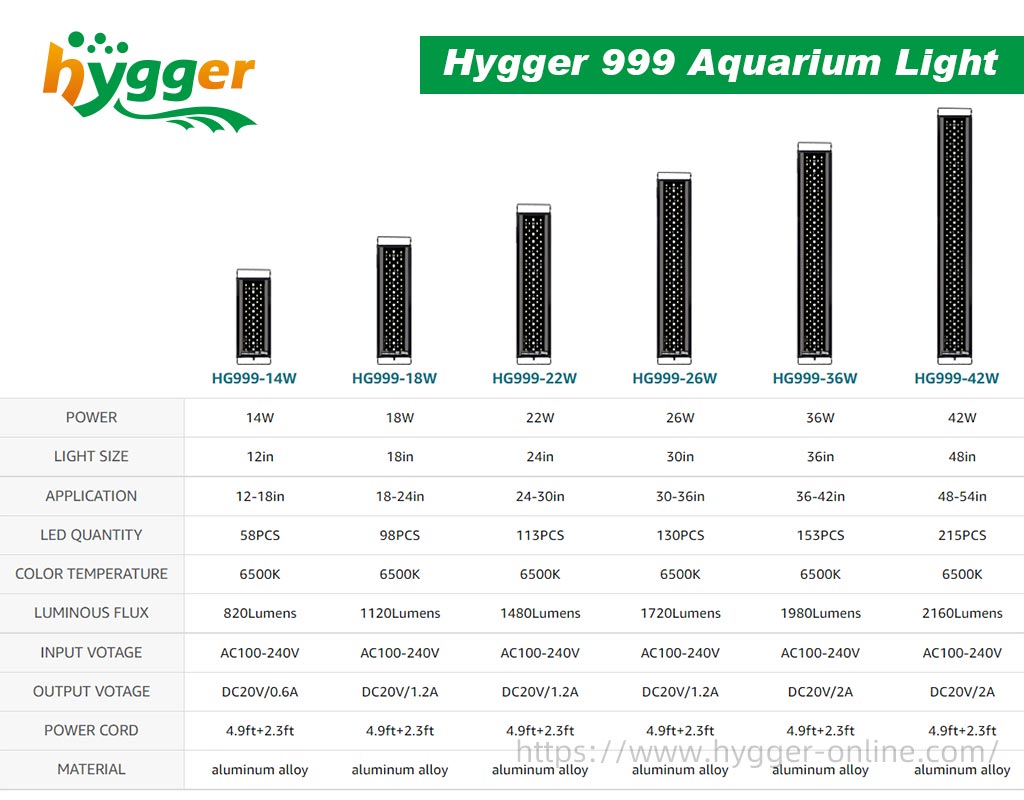
Hygger 999 Aquarium Light
- Model HG-999 48 IN
- Lumen 2160 Lumens
- Power 42W
Power Adapter
- Input: 100-240V-1.2A 50/60Hz
- Output: 20V-2A
By the way, there are also some tips for you:
- Please keep the controller away from water as it is not waterproof.
- Hygger 999 aquarium light is not suitable for saltwater use.
- If you want to turn off the light in any mode, please press the BULB icon.
- Press the BULB icon to turn on the light again when the light is off.
- Do not touch moving parts or hot parts to avoid injury.
- Before operating, please ensure the light fixture is mounted correctly and securely in the position of the aquarium.
- To avoid damage to fish and plants for sudden light changes, the time of day mode and night mode can be overlapped.
Before setting the modes, you should first set or reset your local time.
1. Set the local time
- Hour: Plugin, when the “hour” starts to flash, press the “Up” and “Down” buttons to set the “hour”.
- Minute: Press the “Time Setting” button, when the “minute” starts flashing, press the “Up” and “Down” buttons to set “minute”.
- 12H/24H: Press the “Time Setting” button, when “12H” flashes, press the “Up” and “Down” buttons to select “12H” or “24H”, then press the “Time Setting” button to confirm.
2. Reset local time
- Long press the “Time Setting” button.
- Repeat the same operation of setting local time.
DAY Mode (51)
1. Mode selection
- Press the “M” button once to select “51”.
- Long press the “M” button, then press the “Up” and “Down” buttons to select “ON” at the bottom left.
2. Start time setting
- Press the “M” button, and when the “DAY-L ON” and “hour” flash, press the “Up”, and “Down” buttons to select the “hour” – when the light turns on.
- Press the “M” button again, when the “minute” flashes, press the “Up” and “Down” buttons to select the “minute” – when the light turns on.
3. Brightness setting
- Press the “M” button, when the “Brightness %” flashes, press the “Up” and “Down” buttons to select the brightness of the light.
4. End time setting
- Press the “M” button, when the “DAY-L OFF” and “hour” flash, press the “Up” and “Down” buttons to select the “hour” – when the light turns off.
- Press the “M” button, when the “minute” flashes, press the “Up” and “Down” buttons to select the “minute” – when the light turns off.
5. Press the “M” button to confirm.
Night Mode (52)
1. Mode selection
- Press the “M” button twice to select “52”.
- Long press the “M” button, then press the “Up” and “Down” buttons to select “ON” at the bottom middle.
2. Start time setting
- Press the “M” button, when the “MOON-L ON” and “hour” flash, press the “Up” and “Down” buttons to select “hour” – when the light turns on.
- Press the “M” button, when the “minute” flashes, press the “Up” and “Down” buttons to select “minute” – when the light turns on.
3. Color setting
- Press the “M” button, when the “Brightness %” flashes, press the “Color Setting” button to select the light color.
4. End time setting
- Press the “M” button, when the “MOON-L OFF” and “hour” flash, press the “Up” and “Down” buttons to select the “hour” – when the light turns off
- Press the “M” button, when the “minute” flashes, press the “Up” and “Down” buttons to select “minute” – when the light turns off.
5. Press the “M” button to confirm.
DIY Mode (53)
1. Mode selection
- Press the “M” button three times to select “53”.
- Long press the “M” button, then press the “Up” and “Down” buttons to select “ON”.
2. Press the “M” button to select the L1 period.
(1)Start time setting
- Press the “Up” and “Down” buttons to select the “hour” – when the light turns on.
- Press the “M” button, when the “minute” flashes, press the “Up” and “Down” buttons to select the “minute” – when the light turns on.
(2)End time setting
- Press the “M” button, when the “OFF” and “hour” flash, press the “Up” and “Down” buttons to select “hour” – when the light turns off.
- Press the “M” button, when the “minute” flashes, press the “Up” and “Down” buttons to select the “minute” – when the light turns off.
(3)Brightness and Color setting
- Press the “M” button, when the “Brightness %” flashes, press the “Color Setting” button to select the light.
- Press the “Up” and “Down” buttons to select the brightness of the light.
(4)Press the “M” button to confirm the setting of period 1.
3. Other periods setting (L2-L8 periods)
- Repeat the same operation of the L1 period to set.
4. Finally, press the “M” button to confirm. Then the DIY mode will run automatically.
Conclusion
After reading, have you know more about the Hygger 999 aquarium light? If you have any other questions, please leave your message on NEED HELP, Hygger is glad to help you out!
FAQs
– I want the light to start sunrise at 6:00 am and sunset to be full off by 20:00, with no overnight lights. How can I set it in 51 modes?
- For start time setting
Press the “M” button, when the “DAY-L ON” and “hour” flash, press the “Up”, and “Down” buttons to select the “06”. Then press the “M” button again, when the “minute” flashes, press the “Up” and “Down” buttons to select the “00”.
- For end-time setting
After setting the brightness, press the “M” button, when the “DAY-L OFF” and “hour” flash, press the “Up” and “Down” buttons to select the “20”. Then, press the “M” button again, when the “minute” flashes, press the “Up” and “Down” buttons to select the “00”.
When I use diy mode do I need to do anything with mode 51 or52
Hi George,
You can just DIY the 53 mode by pressing the “M” button to select the L1-L8 period.
Thanks
hygger team